It’s a frustrating (and surprisingly common) laundry-room scenario: the washer stops mid-cycle, and suddenly the dryer won’t start either, or it runs but won’t heat. Before you assume you’re facing two separate breakdowns, it’s worth knowing that one failure can trigger symptoms in both machines, especially in stacked units, laundry centers, and tight laundry closets where power, airflow, and drainage are shared.
This guide walks through the most likely “single point of failure” causes, what you can safely check yourself, and when washer dryer repair is best left to a technician, particularly in Phoenix homes where heat, dust, and hard water add extra stress.
Why one problem can take out both machines
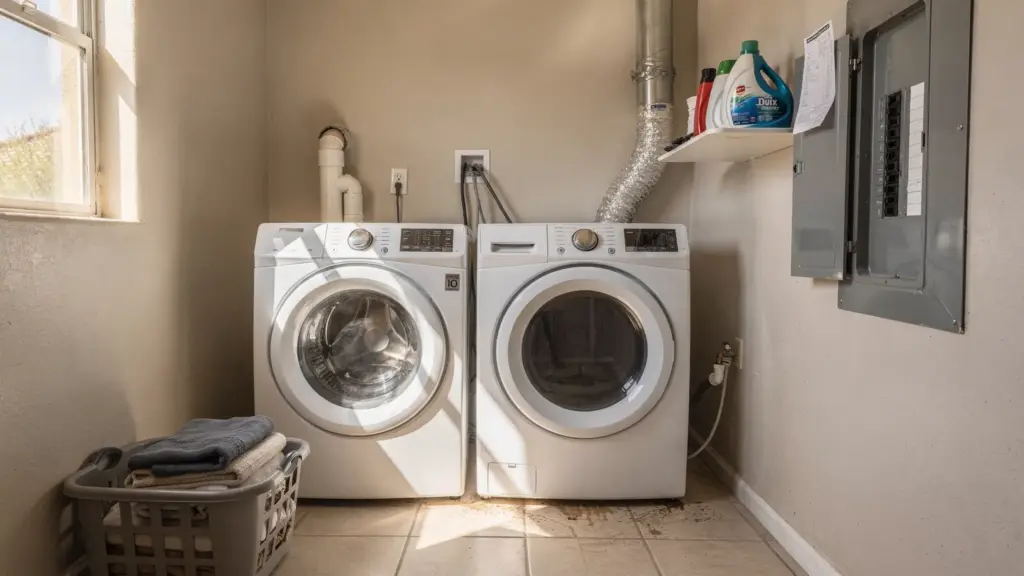
A washer and dryer often feel like two independent appliances, but in many homes they share critical infrastructure. When something upstream goes wrong, both machines can look “broken” even if only one part is actually failing.
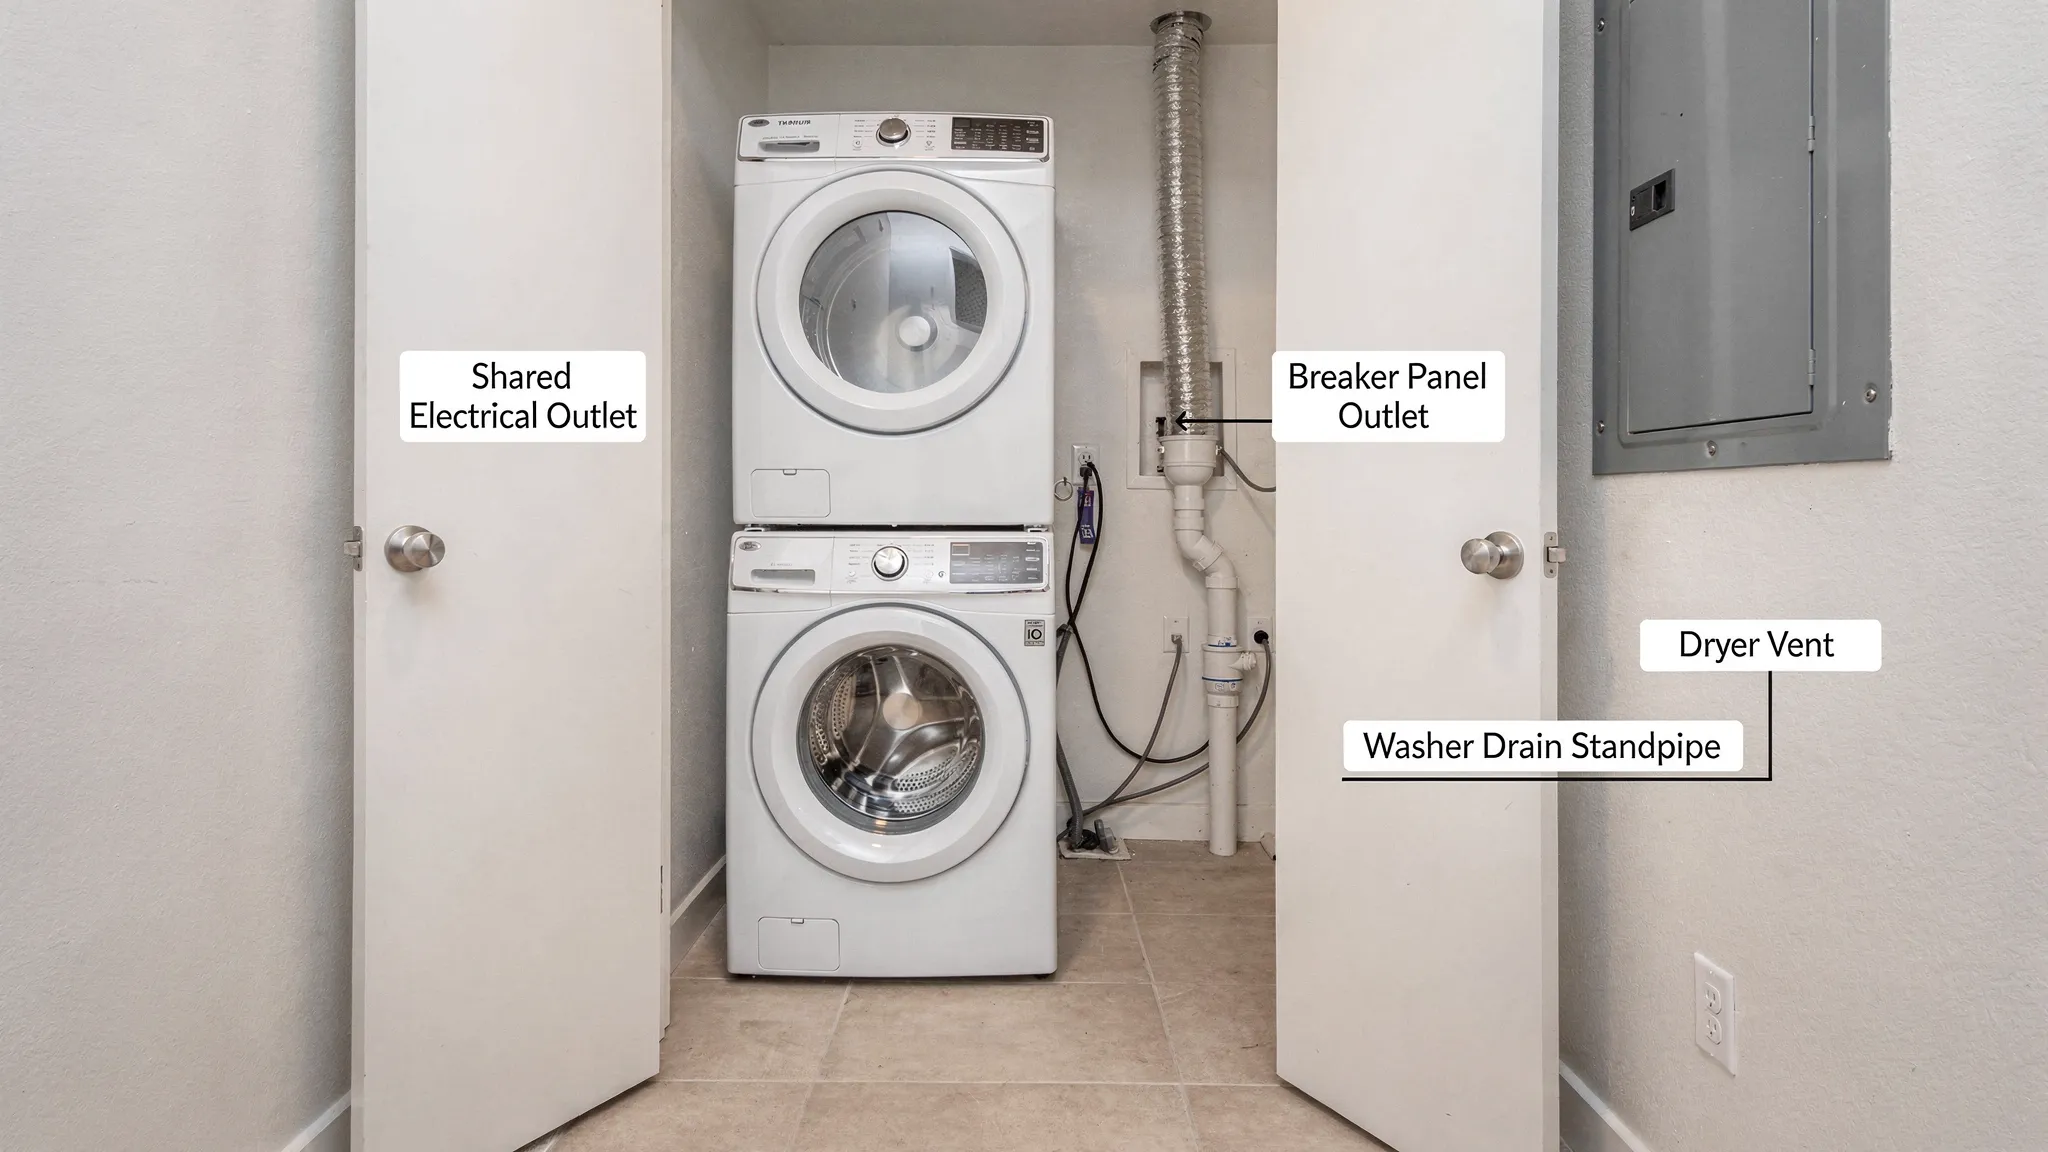
The most common shared dependencies are electrical power, ventilation (for the dryer), and the drain/space around the appliances. If you have a stacked washer/dryer or a laundry center, the coupling is even tighter: access panels overlap, wiring harnesses may run close together, and a leak from the washer can drip directly into the dryer’s electrical area.
Quick safety rules before you troubleshoot
Washer dryer repair involves real hazards: 240V power (electric dryers), gas (gas dryers), sharp sheet metal, and water. A few precautions prevent a small issue from becoming a shock, fire, or flood.
Unplug the machines or switch off the relevant breaker before opening any panels. For electric dryers, remember they often use a two-pole breaker, and a partially tripped breaker can leave you with “some power but not enough,” which creates confusing symptoms.
If you smell gas, do not troubleshoot. Ventilate, leave the area, and contact your gas utility or emergency services.
The most common “single point of failure” culprits
When both machines act up, look for causes that affect the whole laundry setup. The table below helps you map symptoms to the highest-probability checks.
| What you’re seeing | Likely single root cause | Why it affects both | First checks you can do safely |
|---|---|---|---|
| Washer and dryer both dead (no lights) | Tripped breaker, loose plug, failed outlet | Both rely on the same circuit or outlet area | Reset breaker fully, confirm plug is seated, try another small device in the outlet |
| Washer stops and dryer won’t start after a wet cycle | GFCI tripping, moisture intrusion, overloaded circuit | Water, humidity, or load spikes can shut down power | Check nearby GFCI, look for water under/behind units, reduce load and retry |
| Dryer runs but no heat, washer seems fine | Half-tripped 2-pole breaker (electric dryer) | Dryer motor may run on 120V, heater needs full 240V | Reset the dryer breaker fully (off then on) |
| Washer won’t drain or spins poorly, dryer “can’t dry” | Drain restriction, pump issue, overloaded wet load | Clothes stay too wet, so the dryer appears to fail | Check for kinked drain hose, clear lint/debris in drain filter if accessible |
| Dryer takes forever, washer area feels humid/musty | Vent restriction | Poor venting raises humidity and heat in the laundry area | Inspect vent hose for crushing, check exterior vent flap for blockage |
| Both units behave erratically (random resets, error beeps) | Power surge, failing outlet, control board sensitivity | Electronics on both react to unstable power | Try a hard reset, avoid extension cords, consider an electrician if it repeats |
A Phoenix-specific note
Phoenix homes often deal with a combination of heat, airborne dust, and hard water scale. Heat stresses control boards and wiring, dust builds up faster in vents and around motors, and mineral scale can reduce washer fill performance. These factors don’t automatically mean “replace the machine,” but they do make shared-failure scenarios more likely.
A practical troubleshooting flow (highest leverage first)
Below is a safe, homeowner-friendly sequence for isolating what’s really going on. The goal is not to guess parts, but to identify whether the issue is power, airflow, water/drain, or a true component failure.
Power first: breaker, outlet, and “real” resets
Start here whenever both machines are affected.
Check the breaker panel. If you have an electric dryer, flip the dryer breaker fully to OFF, then back to ON. A breaker can look on even when it’s partially tripped.
Next, check the outlet and cord fit. Laundry outlets get loosened over years of vibration. If you see scorching, melted plastic, or smell burnt wiring, stop and call an electrician.
If the washer is on a GFCI (common in some laundry rooms, garages, and newer remodels), press TEST then RESET. A tripped GFCI can kill one or both machines depending on how the receptacles are wired.
A basic “hard reset” can also clear false faults after a surge:
- Unplug both machines (or turn off breakers) for 2 to 5 minutes.
- Restore power to the washer first, then the dryer.
- Run a quick rinse/spin on the washer and a timed dry on the dryer to test.
If a reset works once but the problem returns, treat it as a clue of unstable power, moisture intrusion, or a failing component.
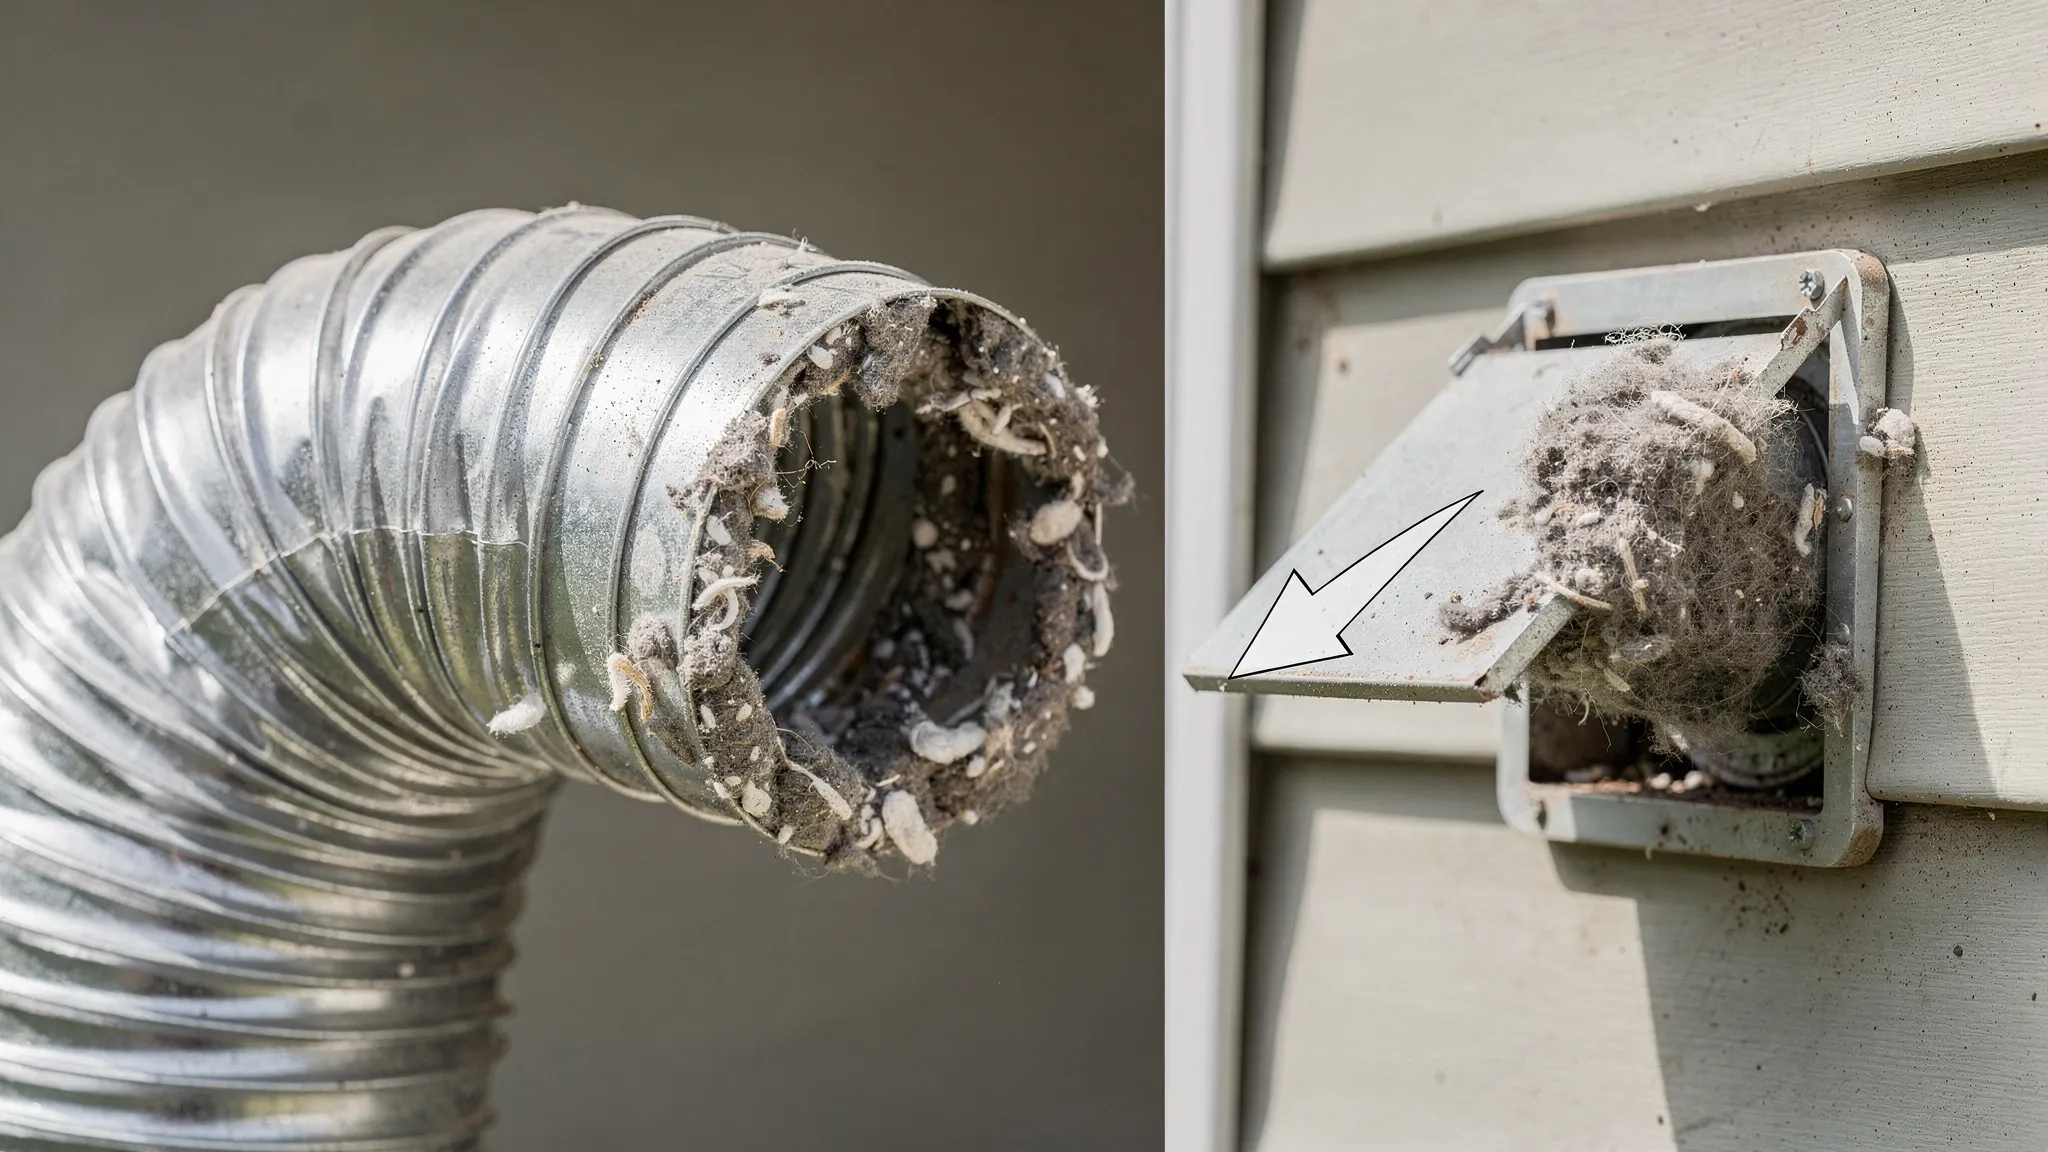
Airflow next: venting problems can look like dryer failure (and affect the washer)
A clogged dryer vent does more than slow drying. It can cause overheating that trips safety devices, and it can dump heat and humidity into the laundry room. That extra humidity can contribute to washer odors, mildew, and even condensation around electrical connections.
The U.S. Fire Administration and NFPA have repeatedly highlighted dryer venting and lint buildup as a major safety concern. Poor maintenance and restricted airflow are common contributors to dryer-related incidents. A good overview is available from the NFPA’s guidance on clothes dryer safety.
A quick vent check:
- Pull the dryer slightly forward and inspect the vent hose for crushing or sharp bends.
- Make sure the hose is rigid or semi-rigid metal when possible (thin foil-style hoses are easier to clog and damage).
- Check the exterior vent hood: the flap should open strongly when the dryer runs.
If your dryer runs hot, shuts off, or won’t restart until it cools, a vent restriction is a prime suspect.
Water and drainage: how washer problems make the dryer look broken
A washer that can’t drain properly (or can’t spin to full speed) leaves clothes much wetter than normal. In that situation, the dryer may run continuously and still not get clothes dry, which feels like a heating failure even when the dryer is fine.
Start by checking obvious drain issues: a kinked drain hose, a standpipe that overflows, or a laundry sink drain that backs up. Also check whether the washer is level. An unlevel washer can reduce spin performance and trigger load balancing behavior that leaves clothes damp.
If your washer is showing a water-inlet related error (for some Samsung models, that includes the “4C” family of errors), it may not fill correctly, then stop mid-cycle. For model-specific inlet troubleshooting, see this guide: Samsung Washer 4C Error: Water Inlet Troubleshooting.
Door and lid switches: one simple failure that halts everything
Washers and dryers both rely on interlocks to prevent operation with the door open. If your washer won’t start or won’t spin, a lid switch or door latch can be the culprit. If your dryer won’t start, a door switch is a common cause.
Why this can look like a “both failed” situation: homeowners often test the dryer immediately after wrestling with a stuck washer load, slamming doors, moving the stack, or shifting the unit to reach a cord. That movement can aggravate a marginal door switch, or it can slightly misalign a stacked unit’s door.
If either door doesn’t close with a firm, consistent click, or if the control panel behaves differently when you press on the door, stop forcing it. Misalignment can be corrected, but forcing it can crack hinges or damage the latch.
Control locks, settings, and “operator error” that mimics a breakdown
It sounds basic, but laundry control panels are increasingly complex.
If the washer “won’t do anything,” verify it’s not in Control Lock/Child Lock mode. If the dryer tumbles but you’re not getting dry clothes, confirm you’re not using an air-only or low-heat setting (especially after a power outage or surge, some models revert to defaults).
Also check cycle matching: if your washer left clothes soaking wet due to a reduced-spin setting, the dryer is being asked to do a job it was not designed to do efficiently.
All-in-one washer dryer combos and laundry centers: shared parts mean shared symptoms
If you have a single all-in-one washer dryer combo (one cabinet that washes and dries), one failure truly can disable both functions. Common shared systems include the drain pump, control board, and moisture/temperature sensing.
Laundry centers (stacked units sold as one paired set) may also share routing for wiring and exhaust. A leak, vibration issue, or power supply problem can cascade quickly.
In these setups, repeated resets, burning smells, or persistent error codes are signs to stop DIY troubleshooting and move to professional diagnosis.
When to call a pro (and what information speeds up the repair)
Some checks are safe for homeowners, but many washer dryer repair scenarios cross into high-voltage, gas, sealed electrical components, or water-leak remediation.
Here’s a practical boundary line.
| Situation | Why it’s not a good DIY job | What to document before you call |
|---|---|---|
| Breaker keeps tripping | Could be wiring, heater short, motor fault, or outlet failure | Which breaker, how fast it trips, what cycle was running |
| Burning smell, hot plug, or scorch marks | Fire risk, damaged conductors | Photos (from a safe distance), exact location of smell |
| Gas dryer issues or any gas odor | Explosion/CO risk | Whether dryer ignites, any error codes, whether vent is clear |
| Water leak near the dryer or beneath a stacked unit | Risk to wiring, floor, and drywall | Where the water appears, when it happens (fill, drain, spin) |
| Dryer runs but no heat and you already reset breaker/checked vent | Likely internal electrical testing needed | Model number, whether it’s electric or gas, vent length/route |
If you’re in the Phoenix area, look for a technician who will give a written estimate and clearly separate diagnostics, labor, and parts. If you’re comparing prices across regions for context, this benchmark article can help you frame questions: How Much Should Washer Repair Cost in Las Vegas? 2025 Price Guide.
Repair vs replace: avoid paying for two new machines when it’s one fix
When both machines “act up,” many homeowners jump straight to replacing the whole laundry pair. Sometimes that’s the right call, but often it’s not, especially when the root cause is upstream (power, venting, drain) or a single replaceable component.
A useful reality check is age. Industry life expectancy varies by brand and usage, but the National Association of Home Builders (NAHB) publishes widely cited life expectancy ranges for home components, including laundry appliances. Their reference is here: NAHB life expectancy table.
Even if your machines are older, remember that replacing both because of one shared issue (like an outlet failure or blocked vent) is the most expensive outcome. A good technician should be able to tell you whether you’re dealing with:
- A site issue (electrical, venting, drain)
- A single-machine failure (pump, belt, igniter, heater circuit)
- A true end-of-life situation (multiple major failures, unavailable parts, severe corrosion)
Preventing “cascade failures” in Phoenix laundry rooms
Once you’ve restored operation, a little preventative maintenance reduces the odds that one issue will take down both machines again.
Keep airflow healthy. Clean the lint screen every load, and periodically inspect the vent path. Long vent runs, crushed hoses, and exterior vent hoods that stick are common culprits in Phoenix where dust and lint accumulate quickly.
Manage vibration and movement. An unlevel washer increases stress on bearings and suspension, and it can shake cords and vent hoses loose over time. Re-level the washer if it “walks” during spin.
Treat water quality as part of maintenance. Hard water can contribute to inlet screen buildup and inconsistent fills. If your neighborhood has very hard water, periodic checks and cleaning (per your model’s instructions) can prevent mid-cycle stoppages.
Finally, protect electronics. If your laundry area is in a garage or a super-hot closet, heat and power fluctuations can shorten the life of control boards. A quality surge protector rated for the appliance load (and installed correctly) can help, but recurring outlet or breaker issues should be evaluated by an electrician.
If you want more Phoenix-focused appliance troubleshooting and repair decision guidance, explore the latest guides at PHX Appliance Fix Blog.