
Food still stuck on plates after a wash cycle is one of the most frustrating kitchen problems, especially when the dishwasher sounds like it ran “normally.” The good news is that most “dishwasher leaving dishes dirty” complaints trace back to a handful of causes you can check in under an hour, often without buying parts.
Below is a practical, homeowner-safe troubleshooting flow, plus Phoenix-specific notes (hard water buildup is a big factor here) and clear signs it’s time to stop DIY and call a pro.
First, identify what kind of “dirty” you’re seeing
Different residue patterns point to different root causes. Before you take anything apart, do a quick visual check right after a cycle finishes.
| What you see on dishes | Most likely cause | Best first DIY check |
|---|---|---|
| Chunky food bits (spinach, rice, grit) | Clogged filter, spray arm blockage, poor loading | Clean filter, inspect spray arm holes, reload with better spacing |
| Greasy film or “not really washed” feeling | Water too cool, weak wash action, wrong cycle | Run hot water at sink before starting, use Heavy/Normal not Quick |
| Cloudy glasses or white film | Hard water minerals, detergent mismatch, low rinse aid | Add rinse aid, verify detergent amount/type, run a cleaner cycle |
| Detergent still in the dispenser cup | Dispenser door blocked, not opening, or poor water spray | Make sure nothing blocks the dispenser, test door movement |
| Clean top rack, dirty bottom rack (or vice versa) | Spray arm not spinning, item blocking spray, low fill | Check rack loading, confirm spray arm spins freely |
If your main issue is standing water in the bottom after the cycle, jump to the drainage section below.
A safe 10-minute triage (no tools)
These checks solve a surprising percentage of dirty-dish complaints.
- Switch cycles once: If you’ve been using Quick/1-Hour, run a single load on Normal or Heavy with heated dry off if you want to reduce energy use.
- Run the kitchen hot water first: Turn your sink to hot and let it run until it’s fully hot, then start the dishwasher. Many units begin washing quickly, and cold-start water can reduce cleaning.
- Confirm the detergent is fresh and appropriate: Old pods or clumpy powder can underperform, especially in humid storage areas.
- Check that the detergent dispenser is not blocked: Large cutting boards, sheet pans, and tall utensils can prevent the door from opening.
- Reload for spray clearance: Put bowls and plates so they face the center, avoid “nesting” spoons, and keep tall items from blocking the upper spray path.
- Top rack rule: Light plastics and cups only, angled so water drains.
- Bottom rack rule: Heavily soiled plates and cookware, but keep clearance for the lower spray arm to spin.
- Add rinse aid (especially in Phoenix): Rinse aid helps prevent spotting and film, and it can improve sheeting so soil rinses away more effectively.
If the next wash is still leaving food behind, the filter and spray arms are the highest-leverage DIY checks.
The most common causes (and the DIY checks that match)
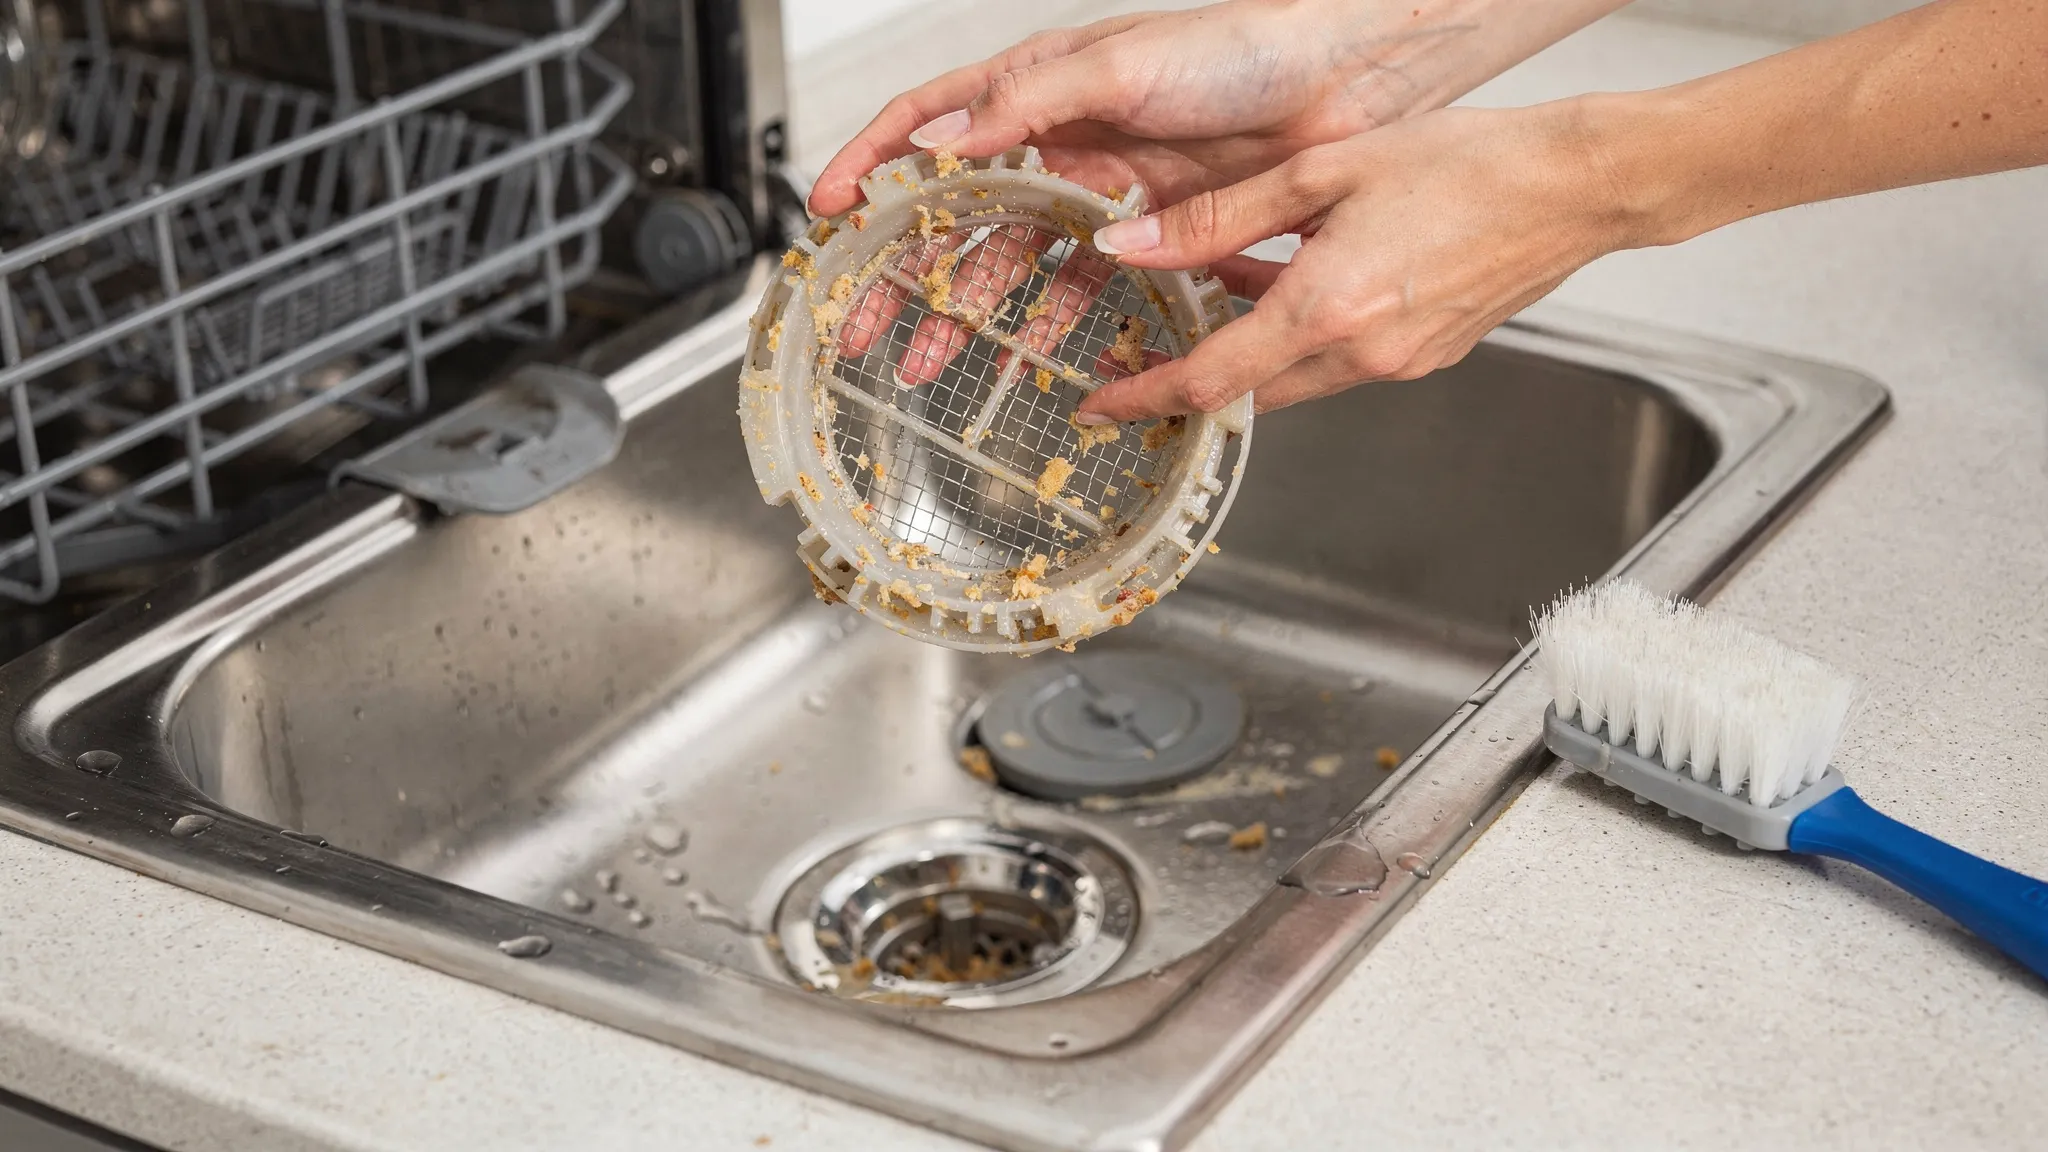
1) A clogged filter (most common)
Modern dishwashers rely on a filter system to keep food particles out of the wash water. If that filter is packed with debris, you can end up recirculating dirty water.
What it looks like: Grit on glasses, spinach flecks on plates, or a “dirty water” smell.
DIY check: Pull the bottom rack out, locate the filter assembly (usually a twist-lock cylinder and/or mesh screen), remove it, and rinse it thoroughly.
Cleaning tip: Use warm water and a soft brush. If there’s greasy buildup, a small amount of dish soap helps. Avoid aggressive scraping that can tear mesh.
2) Spray arms clogged, cracked, or not spinning
Spray arms need clear jets and free movement. A single jam (like a utensil handle) can stop rotation and leave entire zones dirty.
What it looks like: One rack consistently dirtier than the other, or dishes clean on one side only.
DIY checks:
- Spin each spray arm by hand (with the unit off). It should rotate freely without hitting dishes.
- Inspect the small holes for mineral plugs or food bits.
- Remove the spray arm (method varies by model) and rinse it. If holes are blocked, use a toothpick carefully.
Phoenix note: Hard water deposits can slowly narrow spray holes. If you see chalky white crust, mineral buildup is likely part of the story.
3) Water is not hot enough (or the dishwasher isn’t heating properly)
Dishwashers clean best when wash water is hot enough to dissolve detergent properly and break down grease.
DIY checks you can do without electrical testing:
- Run the sink hot water before starting (simple, often effective).
- Choose a cycle that uses a heated main wash (Normal/Heavy often do).
- Listen for normal wash action after fill, you should hear a strong “spray” sound, not a weak trickle.
Important: If you suspect a heater, thermostat, or control issue, that usually requires a technician. Heating circuits involve electrical measurements and should not be guessed at.
For general efficiency guidance, ENERGY STAR’s dishwasher tips are a solid reference point for cycle selection and loading practices: ENERGY STAR dishwasher guidance.
4) Low water fill (not enough water in the tub)
If the dishwasher doesn’t fill to the correct level, you get weak spray pressure and poor cleaning.
Common causes: Partially closed shutoff valve, kinked supply line, stuck float/float switch, inlet valve problem, or low household water pressure.
DIY checks:
- Confirm the dishwasher water shutoff valve (usually under the sink) is fully open.
- Look for kinks in the supply line.
- Check the float inside the tub (often a small dome or cylinder on the bottom). It should move up and down freely.
If the float is stuck due to debris, cleaning around it can restore normal fill. If the inlet valve is failing, that’s typically a pro repair.
5) Detergent problems (type, amount, or dispenser issues)
Even a perfectly working dishwasher will leave dishes dirty if detergent isn’t dispensing or isn’t right for your water.
DIY checks:
- Open the dispenser door by hand (with the unit off) to confirm it isn’t jammed.
- Make sure you’re not overloading the door area with a large item.
- Store detergent in a cool, dry cabinet. Pods can degrade in humid environments.
Hard water tip: In harder water, you may need to adjust detergent amount (follow your detergent brand’s directions). Too little can lead to film and poor soil removal, too much can leave residue.
6) Drainage problems (dirty water gets left behind)
If your dishwasher cannot drain well, it may keep washing in dirty water or leave food grit behind.
What it looks like: Standing water, sludge, or strong odor at the bottom after the cycle.
DIY checks:
- If you recently installed a garbage disposal, confirm the dishwasher inlet knockout plug was removed (a very common missed step).
- Check for a clogged sink air gap (common in many Phoenix homes). A blocked air gap can prevent proper draining.
- Ensure the drain hose has a proper high loop under the counter (or is connected correctly to an air gap).
Drain and plumbing layouts vary, so if you’re unsure, this is a good place to stop and book service rather than experimenting.
7) Weak circulation pump (wash motor) or worn components
If you’ve cleaned the filter, confirmed hot water, and spray arms are clear, but wash action still sounds weak, the circulation pump can be the culprit.
Signs:
- The dishwasher fills and drains, but the “spraying” sound is faint.
- Dishes are consistently dirty regardless of loading and detergent.
- You hear unusual grinding or rattling during the wash portion.
This is usually not a DIY repair for most homeowners, but your observations help a technician diagnose faster.
Step-by-step DIY checks (30 to 60 minutes, homeowner-safe)
If you want a structured workflow, use this order. It’s designed to find the highest-probability issues first without creating new problems.
Step 1: Cut power before hands-on work
Turn the dishwasher off and, if you’ll be reaching near wiring or moving parts, switch it off at the breaker as well.
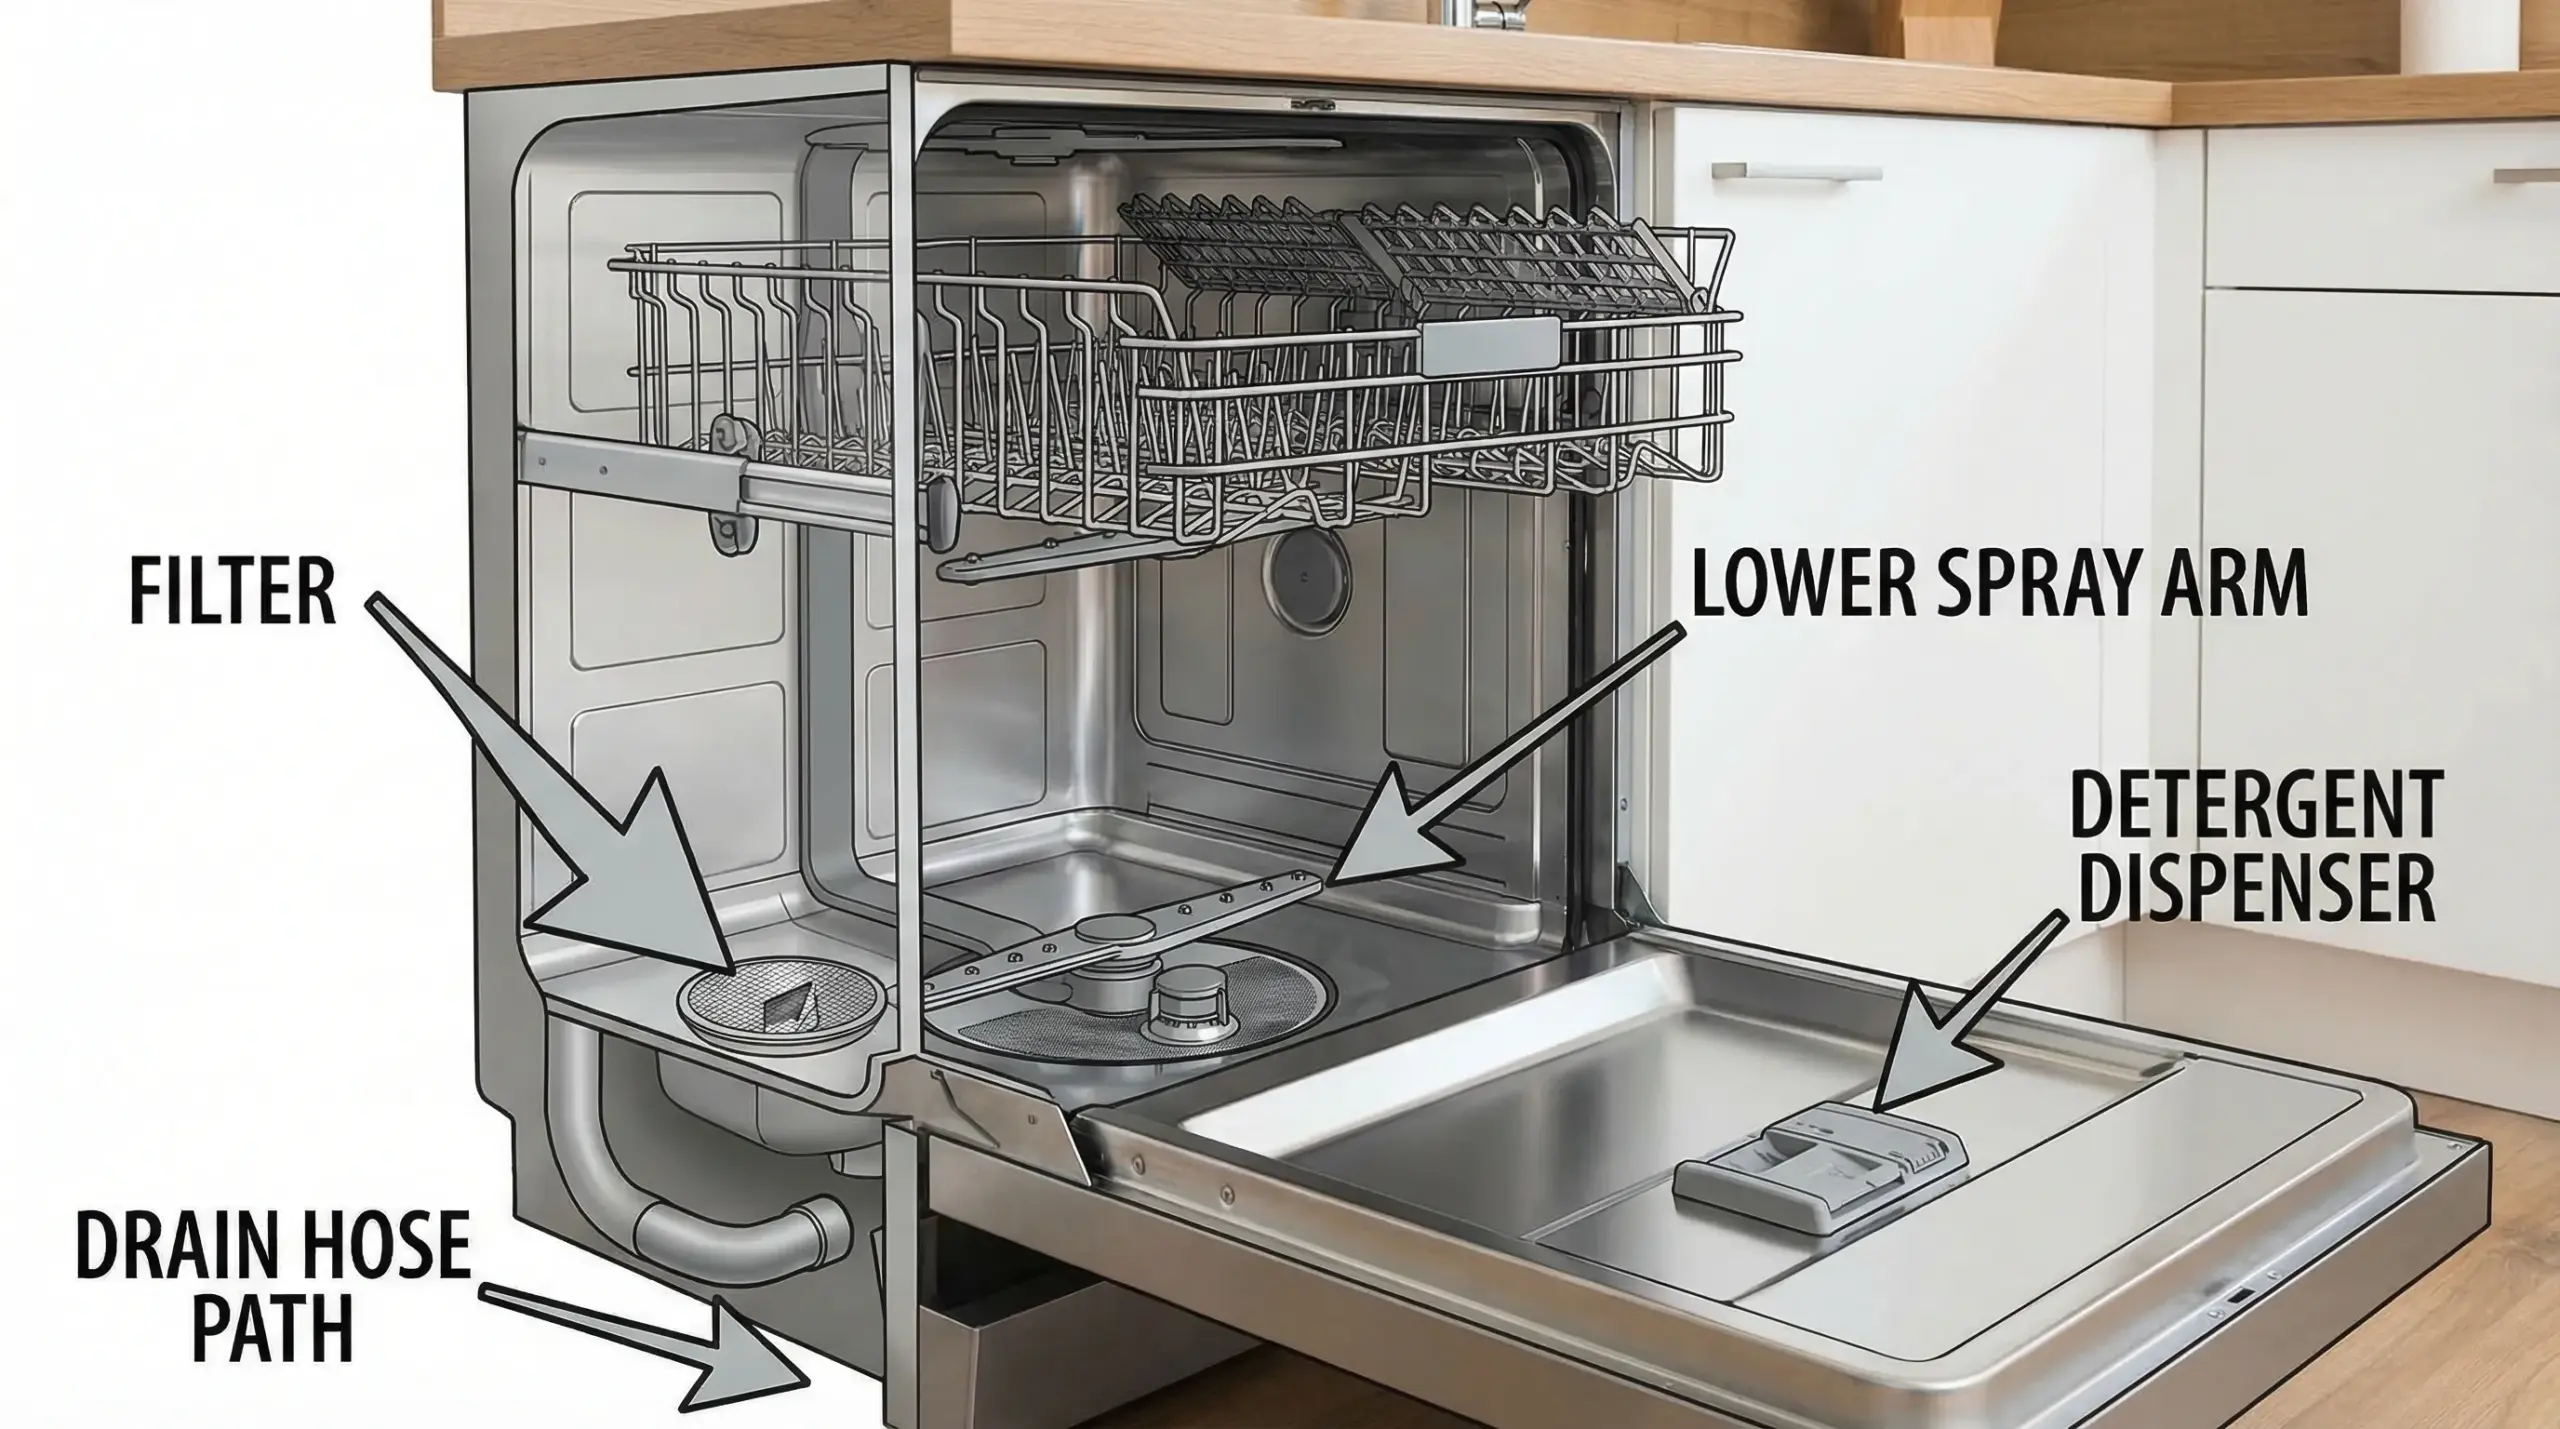
Step 2: Remove and clean the filter and sump area
- Pull out the bottom rack.
- Remove the filter assembly.
- Rinse and brush it clean.
- Wipe out the area around the filter (food and glass shards sometimes collect here).
If you find broken glass, remove it carefully. Consider using a wet paper towel rather than fingers.
Step 3: Inspect and clear spray arms
- Spin each arm by hand to ensure it moves freely.
- Check holes for mineral plugs and debris.
- Rinse the arm under a faucet.
If an arm is cracked, it can lose pressure. Replacement is usually straightforward, but make sure you order the correct part for your model.
Step 4: Verify loading is not blocking wash action
This is more important than most people think.
- Keep tall items from blocking the detergent dispenser and the path of the upper spray.
- Don’t stack bowls tightly, water needs a path in.
- Angle concave items so they drain.
Step 5: Improve the “start conditions” for hot wash performance
- Run hot water at the sink first.
- Run a Normal or Heavy cycle once.
- Use rinse aid.
Step 6: Address hard water buildup (common in Phoenix)
If you’re seeing chalky deposits, cloudy glass, or spray holes crusted over, mineral scale is likely affecting performance.
Safer approach for most homeowners:
- Use a dishwasher cleaner product that’s compatible with your unit and run it on an empty cycle.
- If your home has very hard water, consider whether a water softener system (whole-home or under-sink options) makes sense long-term.
Note: Some manufacturers caution against frequent vinegar use because acids can affect certain rubber components over time. Check your owner’s manual if you’re considering DIY descaling methods.
When to stop DIY and call a dishwasher repair pro
A dishwasher is a mix of water, heat, and electricity. If you hit any of the situations below, it’s smart to stop and schedule service.
- You smell burning, see smoke, or suspect electrical overheating: Turn off the breaker and do not run another cycle.
- The unit is leaking: Shut off the dishwasher water supply valve (usually under the sink) and avoid running it.
- Repeated standing water after cleaning the filter and checking the drain path: Could be a drain pump issue or plumbing connection problem.
- Water is cold every cycle and drying is suddenly poor: Often a heating circuit issue.
- Loud grinding during wash: Can indicate a failing pump or debris damage.
- Error codes persist after a power reset: A technician can interpret codes based on brand and model.
If you’re in Phoenix and trying to get a quick appointment, this guide explains what “same-day” realistically means and how to prep for a faster diagnosis: kitchen appliance repair near me: same-day options.
And if you’re comparing providers, use this checklist to avoid pricing surprises and vet credentials: home appliance repair near me: how to vet a tech.
What a dishwasher service visit usually includes (so you can prepare)
A good technician visit is part diagnosis, part prevention. You can often reduce labor time by sharing clear symptoms.
Before the appointment, write down:
- The brand and model number (often on the door edge).
- What’s dirty (top rack, bottom rack, all dishes).
- Whether detergent is still in the dispenser after a cycle.
- Whether there’s standing water at the end.
- Any unusual sounds and when they happen (fill, wash, drain).
For a clear explanation of how repair bills are typically structured (service fee vs labor vs parts), use this breakdown: appliance repair costs: service fees vs parts explained.
Preventing dirty dishes (a simple monthly routine)
Most dishwashers don’t need constant attention, but they do need basic maintenance, especially in dusty climates and hard-water areas.
A practical routine:
- Weekly: Quick check that spray arms spin freely and nothing is blocking the dispenser.
- Monthly: Rinse the filter and inspect spray arm holes.
- Every 1 to 3 months: Run a dishwasher cleaner cycle, more often if you notice scale or cloudy glass.
- As needed: Refill rinse aid and adjust dosage if your dishwasher has a dial.
If you want a broader home checklist that fits Phoenix conditions (heat, dust, and hard water), this seasonal plan is a good reference: home appliance servicing: a seasonal maintenance plan.
Quick recap: the highest-probability fixes
If you only do three things, do these in this order:
- Clean the filter and the area around it.
- Check and clear the spray arms (and make sure they spin).
- Start cycles with hot water already at the sink, then use Normal or Heavy once to confirm performance.
If you’ve done those and dishes are still coming out dirty, the issue is more likely water fill, heating, drainage, or a weak circulation pump, all of which are strong reasons to bring in a qualified appliance repair technician in Phoenix.