Ice under the crisper drawers is one of those refrigerator problems that looks small, until it keeps coming back, ruins produce, and starts dripping onto your kitchen floor. In most homes, this happens because the fridge is doing its normal automatic defrost, but the defrost drain line is clogged, so water cannot reach the drain pan underneath and instead refreezes inside the cabinet.
If you’re in Phoenix, this can feel extra urgent because many fridges run longer in extreme heat (especially in garages), which can mean more frost buildup and more defrost water to manage.
This guide walks you through a safe, homeowner-friendly drain line fix, plus how to confirm you’re fixing the right thing and how to prevent the ice from returning.
Why ice forms under the crisper drawers (what’s supposed to happen)
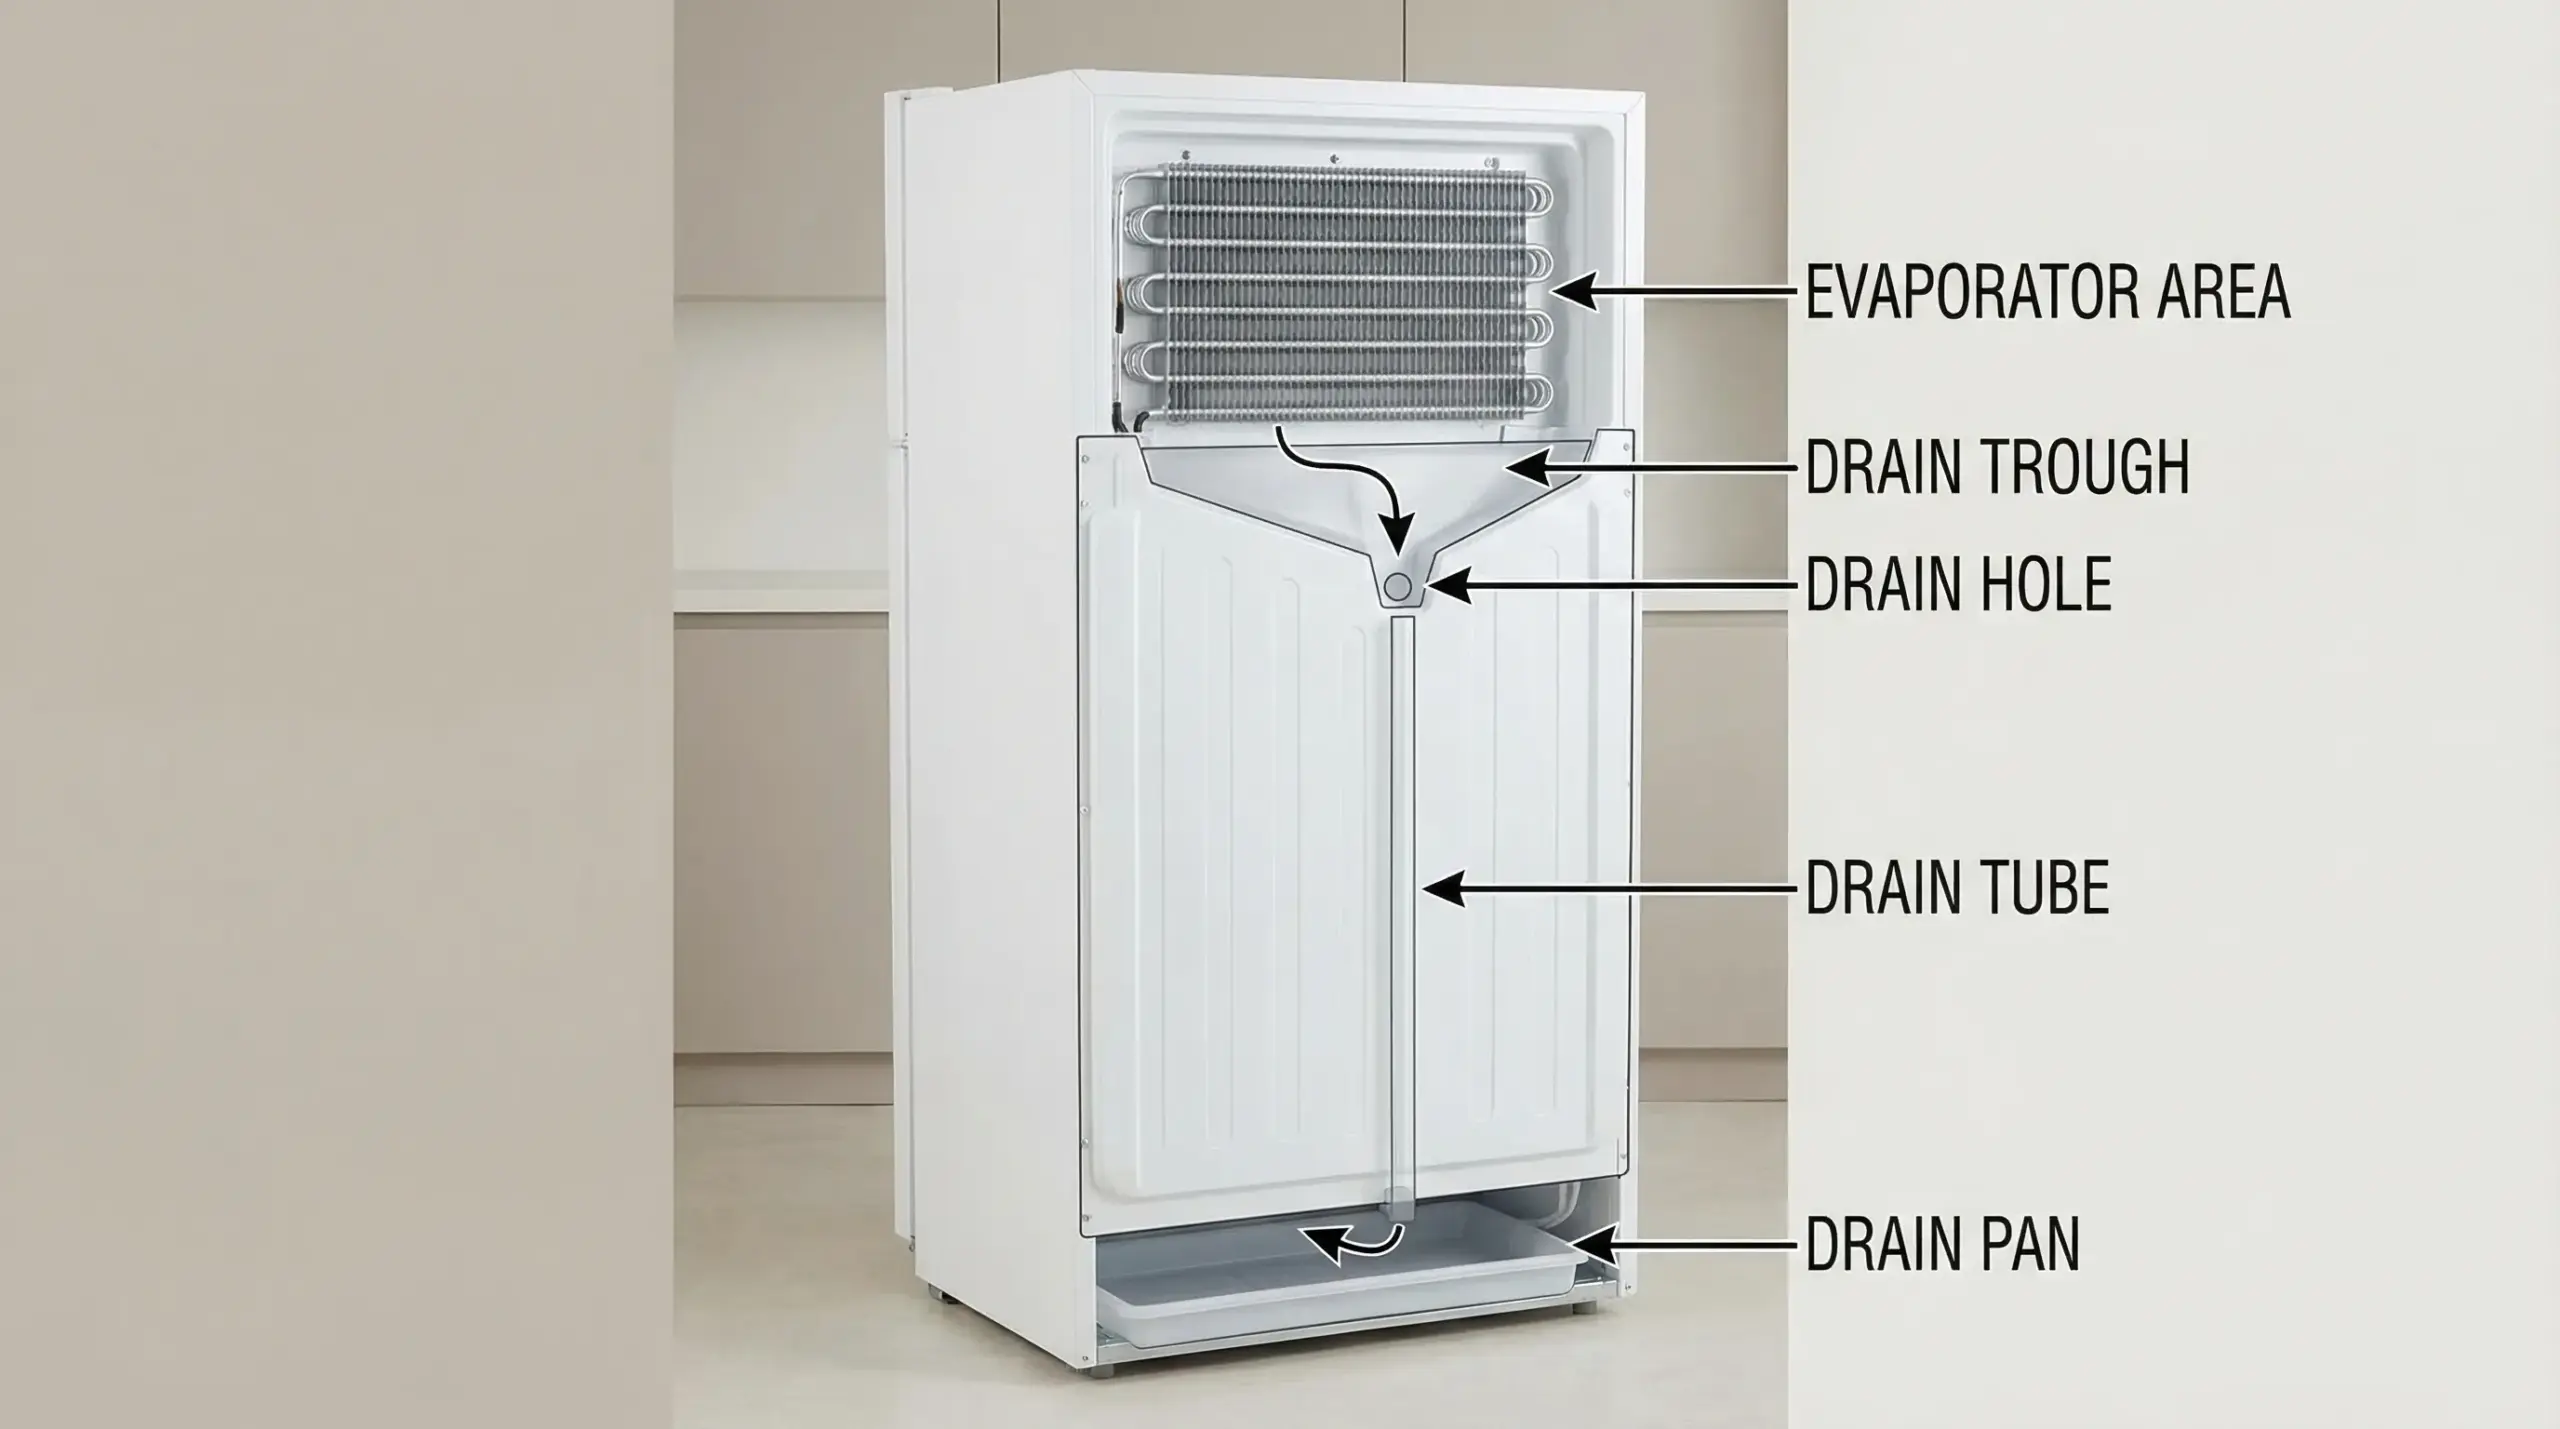
Most modern refrigerators periodically defrost the evaporator coil. During that cycle:
- Frost melts into water.
- Water flows into a small drain trough and down a drain hole.
- It travels through a drain tube to a drain pan underneath the fridge where it evaporates.
When the drain hole or tube clogs (food bits, mold biofilm, dust, or a “duckbill” grommet that sticks shut), the water backs up. Depending on your fridge design, it can:
- Refreeze and create a sheet of ice under the crispers.
- Leak into the fridge compartment.
- Overflow into the freezer and later melt.
Quick diagnosis: is it really a clogged drain line?
Before you tear into anything, confirm the pattern. This table covers the most common “ice under crisper drawers” lookalikes.
| What you see | Most likely cause | Why it happens | Best first move |
|---|---|---|---|
| Ice sheet or puddle under crispers, repeats every few days | Clogged defrost drain | Defrost water has nowhere to go, so it refreezes or pools | Clear the drain hole and tube (steps below) |
| Water beads/condensation in fridge, food spoils faster, motor runs a lot | Door not sealing, warm air infiltration | Humid air enters and later freezes/thaws | Check gasket and door alignment; see refrigerator door seal signs |
| Water on floor near front, especially after using dispenser/ice maker | Water supply line leak, filter housing leak, or dispenser tubing issue | Pressurized water escapes | Shut off water, inspect filter/lines, consider service |
| Heavy frost on freezer back wall plus warming fridge temps | Defrost system problem (heater, thermostat, control) | Frost never melts properly | Use a controlled troubleshooting flow or call a tech; start with safe DIY fridge steps |
One more important check: keep your fridge at a safe temperature while troubleshooting. The FDA recommends 40°F (4°C) or below for refrigerator temperature for food safety. If temps rise above that and food is at risk, pause DIY work and prioritize cooling. (See FDA guidance: Refrigerator and freezer safety.)
What you’ll need (and what to avoid)
You do not need special tools for most drain clogs. Gather these items first:
- Towels (you will melt ice and flush water)
- A shallow tray or baking sheet (to catch water)
- A hair dryer (low heat) or a bowl of hot water (not boiling)
- A turkey baster or large squeeze bottle (best tool for flushing)
- Flexible zip tie, pipe cleaner, or small plastic tubing (for gentle clearing)
- Mild dish soap
- Optional: white vinegar or baking soda (for cleaning biofilm and odor)
Avoid these common mistakes:
- Don’t use knives, screwdrivers, or chisels to chip ice (easy way to puncture liner or refrigerant tubing).
- Don’t pour boiling water into plastic parts.
- Don’t mix bleach with vinegar or other cleaners.
Step-by-step: drain line fix for ice under crisper drawers
These steps cover the most common designs. Your drain hole may be in the fridge compartment (behind crispers) or in the freezer (under the evaporator cover). Either way, the goal is the same: melt the ice, open the drain hole, flush the tube, and clear the outlet.
Step 1: Protect food and unplug the refrigerator
- Move perishables to a cooler if the doors will be open for more than a few minutes.
- Unplug the fridge (or switch off the breaker). You will be working near fans and wiring.
- Lay towels around the fridge, and keep a shallow tray ready inside.
Step 2: Remove crisper drawers (and the shelf above if needed)
- Pull out the drawers.
- Remove the crisper cover or shelf if it blocks access.
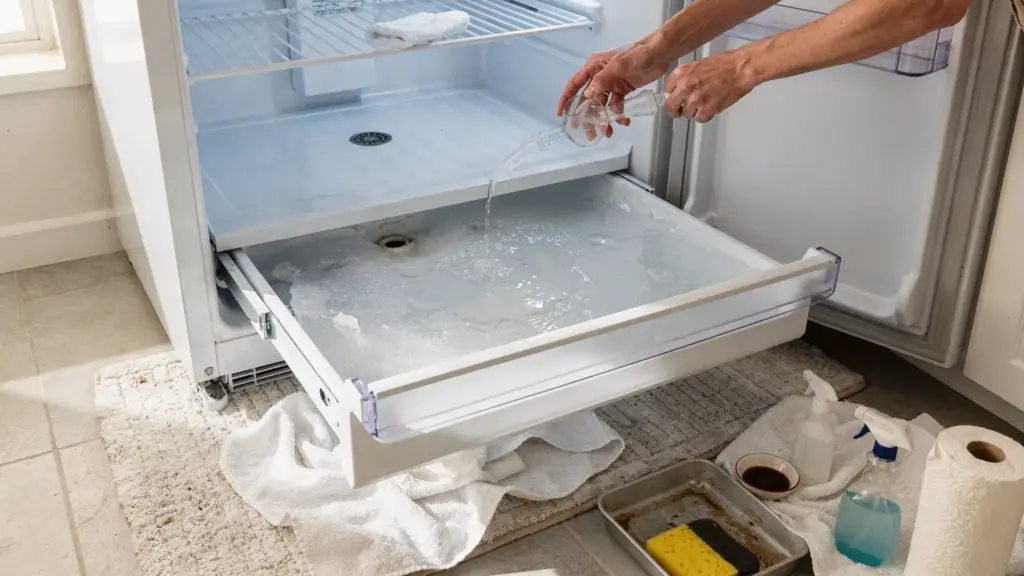
- Soak up standing water so you can see where ice is forming.
Step 3: Melt and remove the ice safely
Use one of these safer methods:
- Hair dryer on low, moving constantly and never close to plastic.
- Hot (not boiling) water in a bowl placed on the ice to soften it.
- Warm, wet towels laid over the ice to speed melting.
As the ice loosens, lift it out in chunks by hand. Keep towels handy because once the drain opens, water may suddenly start moving.
Step 4: Find the drain hole and trough
Look for:
- A small hole at the center of a shallow channel at the back of the compartment.
- A plastic funnel-like piece leading to a hole.
In some bottom-freezer and French-door models, the drain is under a rear freezer panel, not in the fridge section. If you do not see a drain hole behind the crispers, jump to the “Model-specific notes” section below.
Step 5: Flush the drain hole from the inside
Once you’ve exposed the drain hole:
- Fill your turkey baster with hot water.
- Forcefully squeeze water into the drain hole.
If the drain is partially blocked, you may see water back up. Keep flushing until you hear water trickling down the tube.
If it’s stubborn:
- Add a few drops of dish soap to hot water and flush again.
- Use a flexible zip tie or pipe cleaner to gently probe the hole (do not force it).
A practical test: after clearing, slowly pour a small cup of water into the trough. It should disappear quickly, not pool.
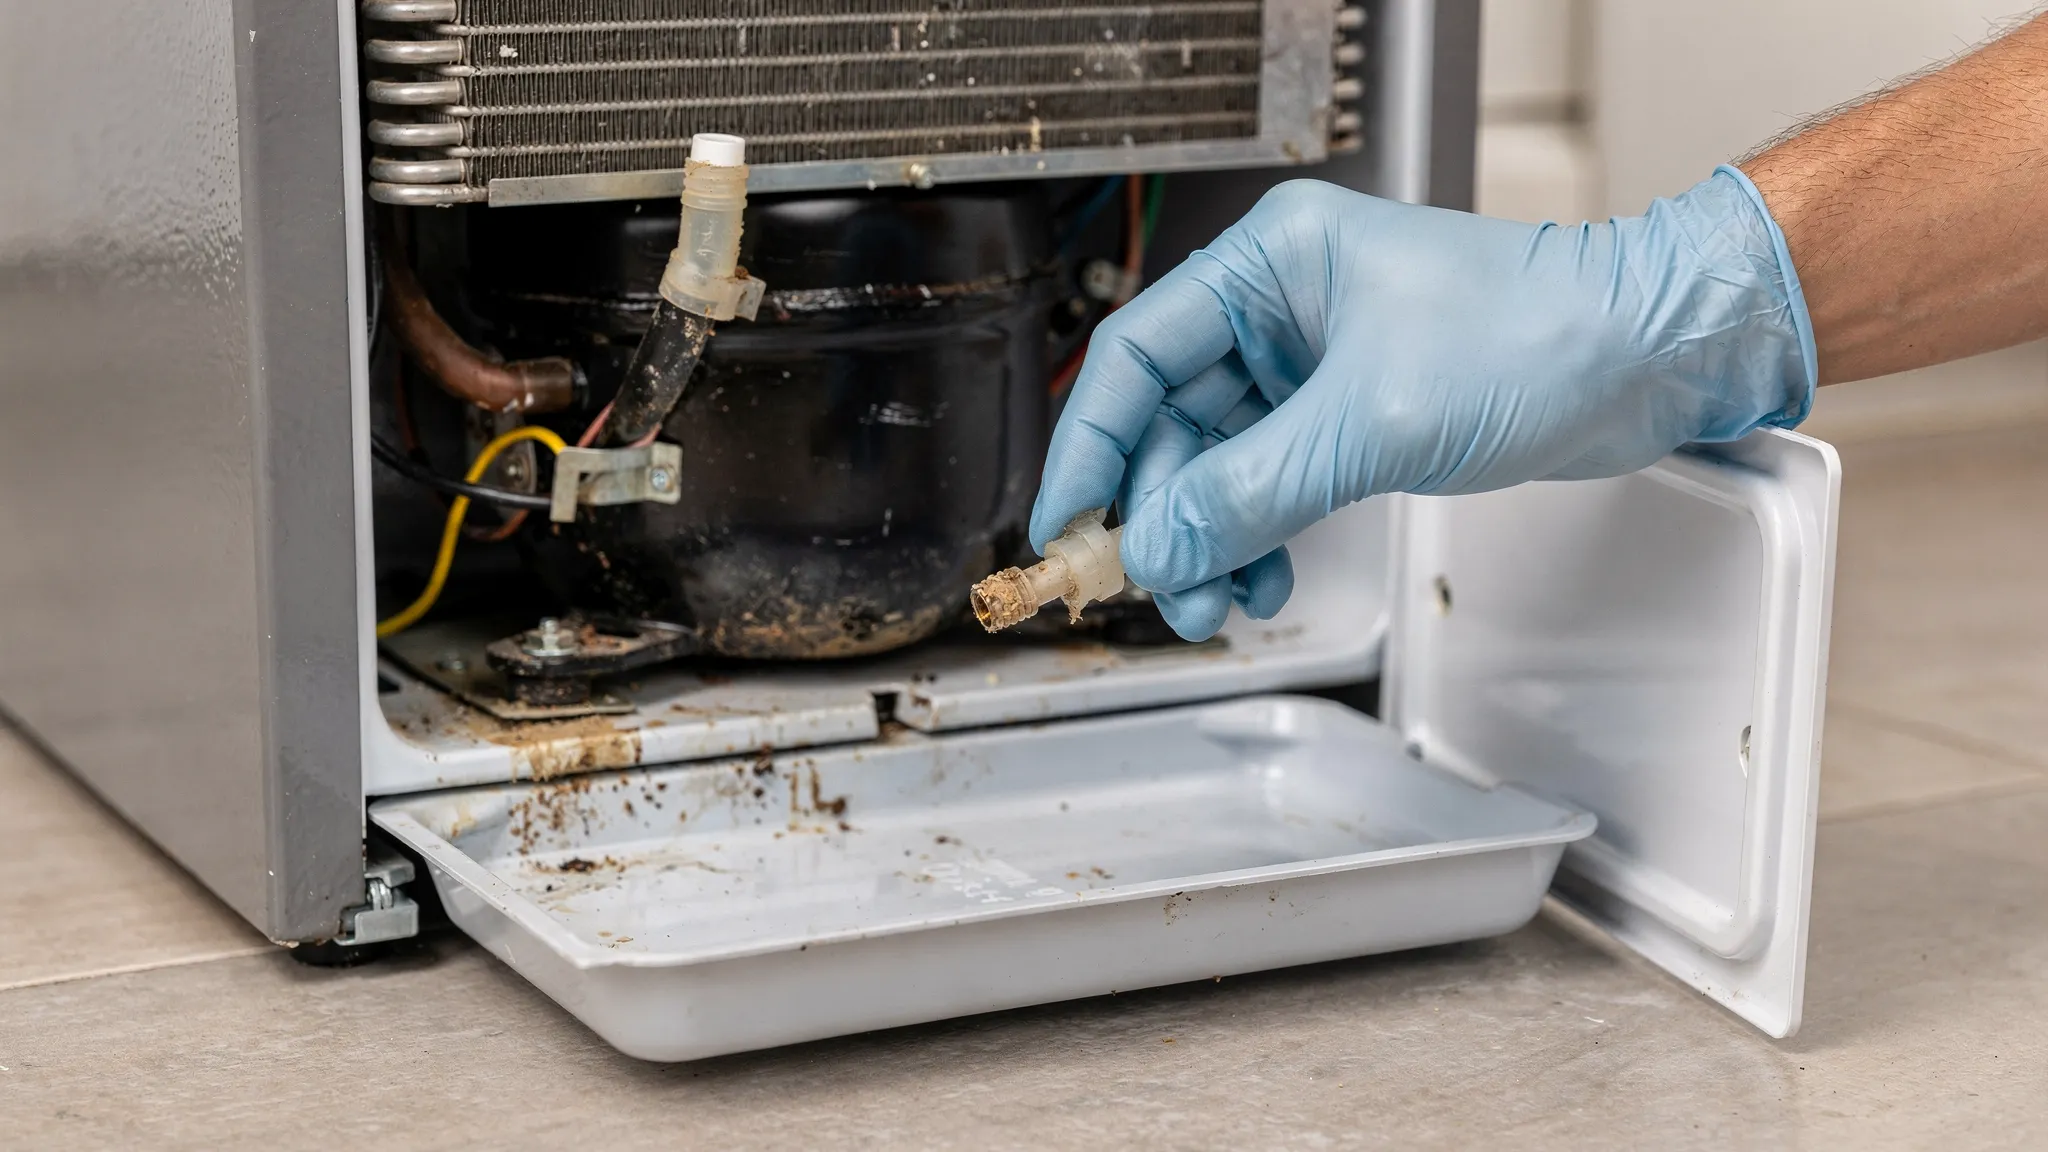
Step 6: Clear the drain tube outlet at the back (the “duckbill” clog)
Many recurring clogs are not at the drain hole, but at the bottom end of the drain tube where it exits near the drain pan. Some brands use a rubber check valve (often called a duckbill) that can trap debris and stick closed.
- Pull the fridge out carefully.
- Remove the lower rear access panel if present.
- Locate the drain pan and the drain tube above it.
What to do:
- If there is a rubber duckbill grommet, remove it and rinse it thoroughly.
- Clean out sludge and debris from the tube end.
- Reinstall the grommet (or leave it off only if your model allows it; some designs need it for airflow and pest control).
If you’re unsure, take a photo before removing anything so you can restore the original configuration.
Step 7: Reassemble and run a confirmation test
- Reinstall drawers and shelves.
- Plug the fridge back in.
- Over the next few hours, check that:
- The drain area stays clear.
- No new water is pooling under the crispers.
- The freezer is not building abnormal frost.
If you want a more confident “pass/fail,” place a dry paper towel under the crispers for a day. Any new water will show quickly.
Model-specific notes (top freezer, bottom freezer, French door, side-by-side)
Drain access differs, but the clog logic is the same.
Top-freezer refrigerators
Common pattern: ice appears under crispers because the drain line in the freezer freezes over or clogs.
Typical access:
- Remove items from the freezer.
- If there is a rear freezer panel, remove it (usually a few screws) to access the drain trough under the evaporator.
- Melt ice around the drain trough and flush.
If the drain keeps freezing shut even after clearing, a tech may need to check for missing or misplaced drain heat strips, insulation issues, or a defrost control problem.
Bottom-freezer and French-door refrigerators
Common pattern: water leaks to fridge section, then refreezes under crispers.
Typical access:
- Remove freezer baskets/drawers.
- Remove the rear inside freezer panel.
- Clear ice at the drain trough and flush.
These models often have more internal ducting, so be patient with panel removal and avoid forcing plastic clips.
Side-by-side refrigerators
Common pattern: water or ice may appear on the fridge side while the drain blockage is actually on the freezer side.
Typical access:
- Focus on the freezer evaporator area for the drain trough.
- Confirm airflow vents are not blocked, since airflow issues can contribute to frost and excess defrost water.
Prevent the ice from coming back (especially in Phoenix)
Once you clear a drain, prevention is mostly about reducing debris and reducing excess frost.
Keep door seals and alignment in good shape
A leaking door gasket pulls warm air in, creating more frost and more defrost water.
- Inspect and clean seals regularly.
- Confirm doors self-close and sit level.
If you suspect a weak seal, use the checks in refrigerator door seal repair.
Clean condenser coils and improve airflow
Dusty coils can keep a refrigerator running hotter and longer. In Phoenix, dust and pet hair buildup is common.
If your fridge is struggling to hold temp or seems to run constantly, follow the coil and airflow steps in safe DIY refrigerator troubleshooting.
Reduce drain debris and biofilm
- Wipe spills quickly (especially sugary liquids).
- Keep uncovered foods from touching the back wall.
- Every few months, flush the drain with hot water to discourage buildup.
Make sure the fridge is level
A refrigerator that tilts forward can encourage water to run the wrong way.
- The front feet should be slightly higher than the back so doors close firmly.
When to stop DIY and call a refrigerator technician
A clogged drain is usually a safe DIY fix, but it’s not the only cause of repeated ice and water issues. Consider professional help if:
- You clear the drain and the ice returns within a week or two.
- You see heavy frost buildup behind freezer panels (possible defrost heater, thermostat, or fan issue).
- The refrigerator temperature is unsafe (above 40°F) or food is at risk.
- Water is leaking onto the floor near electrical components.
- The unit is in a hot garage and can’t keep up, even after coil cleaning and airflow checks.
If you need urgent help because temperatures are rising, use a same-day triage approach similar to what we outline in kitchen appliance repair near me: same-day options. And if you’re weighing whether a repair is worth it, this Phoenix-focused breakdown can help: refrigerator repair cost in Phoenix.
Frequently Asked Questions
Why does my fridge keep freezing water under the crisper drawers? Most repeat cases are a partially cleared defrost drain, a clogged duckbill/check valve at the drain tube outlet, or excess frost from a door seal leak that creates more defrost water than the drain can handle.
Can I pour bleach down a refrigerator drain line? It’s usually not recommended for DIY because of fumes, splash risk, and potential damage to materials. Start with hot water and a small amount of dish soap. If odor or slime is persistent, a mild vinegar flush can help (never mix with bleach).
How do I know I actually cleared the drain tube? After flushing, pour a small cup of water into the drain trough and confirm it disappears quickly without pooling. If possible, check the drain pan underneath (rear access) for fresh water shortly after.
Is ice under the crispers dangerous? It’s more of a damage and spoilage risk than an immediate hazard, but it can lead to unsafe food temperatures, moldy standing water, and floor leaks. If your fridge cannot stay at 40°F or below, prioritize cooling and consider service.
Why does this happen more in summer? Warm conditions can increase run time and moisture entry (especially with frequent door openings), which increases frost and defrost water. In Phoenix, garage installations and dusty coils can make the issue more likely.
Need help fast in Phoenix?
If you’ve cleared the drain line and the ice keeps returning, or your refrigerator can’t hold safe temperatures, it may be time for a deeper diagnosis (defrost system, airflow, fan issues, or a drain design problem). Explore more Phoenix-focused troubleshooting and repair planning resources at PHX Appliance Fix Blog, including our guides on same-day repair options and local refrigerator repair costs.