
A refrigerator is one of the few appliances that runs all day, so some noise is normal. What matters is the sound type, where it comes from, and whether it’s new or getting louder. In Phoenix, high ambient temps can also make a fridge run longer, which can make normal operating sounds more noticeable.
Below is a practical “sound-to-meaning” guide so you can quickly tell what’s normal, what’s fixable with simple checks, and what typically needs a technician.
First: what “normal” refrigerator noise sounds like
Most modern refrigerators make occasional sounds as they cycle on and off and as temperatures change inside the cabinet.
Normal sounds often include:
- A steady low hum while the compressor runs
- Brief clicks when the compressor starts or stops
- Light whooshing or air movement from fans
- Gurgling or water trickling as refrigerant and defrost water move
- Popping or cracking as plastic liners expand and contract
Manufacturers describe many of these as expected operating noises. For example, GE and Whirlpool both note that clicking, popping, and gurgling can be normal depending on the cycle and model (GE support, Whirlpool support).
Quick diagnosis: match the sound to the likely cause
Use this table as your starting point, then jump to the section for that sound.
| Sound you hear | Most common meaning | Where it usually comes from | DIY checks to try | Urgency |
|---|---|---|---|---|
| Humming (steady) | Compressor running normally, or condenser fan working harder | Back/bottom | Clean condenser area, confirm airflow, check if louder than usual | Low unless getting louder or cooling is poor |
| Buzzing | Ice maker fill valve, condenser fan hitting debris, compressor struggling to start | Back/bottom or freezer | Turn off ice maker, inspect for vibration, clean coils | Medium if persistent |
| Clicking (repeated) | Start relay/overload issue, control relay, ice maker cycling | Back/bottom or inside control area | Listen for pattern, check outlet/extension cord use | Medium to high if rapid and fridge warms |
| Rattling/vibration | Unit not level, something touching the cabinet, loose drain pan, fan shroud vibration | Back/bottom/sides | Level the fridge, pull it away from wall, secure loose items | Low to medium |
| Knocking/thumping | Normal refrigerant equalization, ice maker dump, fan blade hitting ice | Freezer or back | Check for ice buildup, clear obstructions | Medium if frequent or accompanied by frost |
| Squealing/chirping | Fan motor bearings wearing (evaporator or condenser fan) | Freezer (evap) or back (cond) | Identify which fan, check for rubbing/ice | High if continuous |
| Grinding | Fan blade hitting ice, failing fan motor, compressor problem (less common) | Freezer or back/bottom | Defrost/inspect for ice, stop use if severe | High |
| Hissing | Refrigerant flow (brief), defrost heater melting frost, or (rarely) sealed system leak | Inside/back | Note if only during defrost, check cooling performance | Medium, high if cooling declines |
| Dripping/water running | Defrost water into drain pan, or clogged drain causing overflow | Inside or bottom | Check drain pan, inspect for leaks, clear drain if accessible | Low to medium |
Humming: when it’s normal and when it’s a red flag
What it usually means: A steady hum is often just the compressor running and refrigerant circulating.
Why it can be louder in Phoenix: When your kitchen is warm (or your garage is hot), the refrigerator may run longer to maintain safe temps, so you hear the hum more.
DIY checks:
- Make sure the fridge has breathing room behind it and isn’t pushed tightly against the wall.
- Clean dust and pet hair from the condenser area (unplug first). Many models have coils underneath or behind a kickplate.
- Listen for a “strained” hum plus frequent stopping/starting, which can point to a start device or compressor stress.
Call a pro if: The hum is significantly louder than before, the fridge is warm, or you notice frequent cycling that wasn’t happening previously.
Buzzing: commonly ice maker related, sometimes fan related
What it usually means: Buzzing often comes from:
- Ice maker water inlet valve energizing during a fill
- Condenser fan hitting debris, a wire, or a loose panel
- Compressor trying (and failing) to start
DIY checks:
- If the buzz happens in short bursts and you have an ice maker, turn off the ice maker for 24 hours and see if it stops.
- Pull the fridge slightly forward and check for anything touching the back (water line, cord, cabinet trim) that could vibrate.
- Check that the unit is level. A slight tilt can change vibration patterns.
Call a pro if: Buzzing is paired with warming temperatures, repeated clicking, or the compressor feels extremely hot to the touch (do not touch bare components, just note excessive heat around the back/bottom area).
Clicking: normal single clicks vs repeated rapid clicking
What it usually means: A single click at start/stop is often normal. Repeated clicking every few seconds can indicate the compressor start relay or overload is tripping.
DIY checks:
- Plug the refrigerator directly into a wall outlet (avoid extension cords or power strips).
- Note the pattern: does it click repeatedly for minutes? Does cooling stop?
- Check for a recent power outage or surge. If it started right after, a component may have been stressed.
Call a pro if: Clicking is rapid and continuous, or the fridge/freezer is not holding temperature. Start device issues are common and relatively straightforward for technicians to confirm, but misdiagnosis can lead to unnecessary parts.
Rattling and vibration: often the easiest fix
What it usually means: Something is shaking, not necessarily something is “broken.” Common sources include an unlevel fridge, a loose drain pan, or the cabinet touching a wall.
DIY checks:
- Confirm the fridge is stable and level (front-to-back and side-to-side). Adjust leveling legs if present.
- Pull it away from the wall so nothing touches the back.
- Remove items from the top and nearby cabinets that may be vibrating in sync.
- If accessible, ensure the drain pan is seated properly.
Call a pro if: The rattling is coming from inside the freezer wall area (could be an evaporator fan issue) or it quickly returns after leveling.
Knocking or thumping: ice maker, airflow, or ice buildup
What it usually means: A periodic thump can be an ice maker dumping cubes into the bin. It can also be a fan blade contacting ice buildup.
DIY checks:
- Open the freezer and listen: does the sound change when the door is open? Many evaporator fans slow or stop with the door switch, which helps identify fan-related noise.
- Look for frost or ice buildup on the rear freezer panel. Heavy frost can point to a defrost problem, door seal leak, or airflow issue.
Call a pro if: You see heavy frost combined with knocking and reduced cooling. Defrost system diagnostics typically require electrical testing.
Squealing or chirping: often a fan motor wearing out
What it usually means: A high-pitched squeal is commonly a fan motor bearing beginning to fail.
- Evaporator fan noise is usually heard from inside the freezer.
- Condenser fan noise is usually heard from the back/bottom.
DIY checks:
- Identify location. If it’s loudest in the freezer, suspect the evaporator fan.
- If the sound changes after a full defrost (power off and doors open long enough to melt ice), it may have been ice contact rather than a failing motor.
Call a pro if: The squeal is continuous, returns quickly after defrosting, or is accompanied by warming temperatures. A failing fan can lead to poor airflow and spoiled food.
Grinding: treat as urgent
What it usually means: Grinding is commonly:
- Fan blades hitting ice or a warped shroud
- A failing fan motor
Less commonly, severe grinding paired with poor cooling can indicate a compressor-related issue.
DIY checks:
- Do not ignore grinding. If you suspect ice contact, a careful defrost can help confirm.
- Check for ice buildup and blocked vents.
Call a pro if: Grinding continues after basic checks, or temperatures rise. Fan failures can worsen quickly.
Hissing: normal during defrost vs concerning when cooling drops
What it usually means: Brief hissing can occur when:
- Refrigerant flows through the evaporator
- The defrost heater melts frost
When it can be concerning: If hissing is new and constant and cooling performance declines, it could signal a sealed-system issue (which requires specialized tools and certification to diagnose and repair).
DIY checks:
- Note timing. If it happens periodically and stops, it may be tied to defrost.
- Confirm door seals are closing fully and nothing is preventing the door from sealing.
Call a pro if: You have hissing plus warm temps, oily residue near copper lines, or the unit runs constantly without reaching temperature.
Dripping or water-running sounds: usually defrost water, sometimes a clogged drain
What it usually means: During defrost, water melts and drains to a pan where it evaporates. This can sound like dripping or a small stream.
DIY checks:
- Check the drain pan for overflow or cracks if it’s accessible.
- If you see water pooling inside the fridge or freezer, the defrost drain may be clogged.
Call a pro if: Water keeps pooling inside compartments, ice forms around the freezer floor, or you notice leaking onto your kitchen floor.
A simple workflow to pinpoint the source (without taking the fridge apart)
You do not need to disassemble panels to do a useful first diagnosis. Focus on observation.
1) Confirm the “where”
Stand in front, then move to the sides, then behind. Note where it’s loudest:
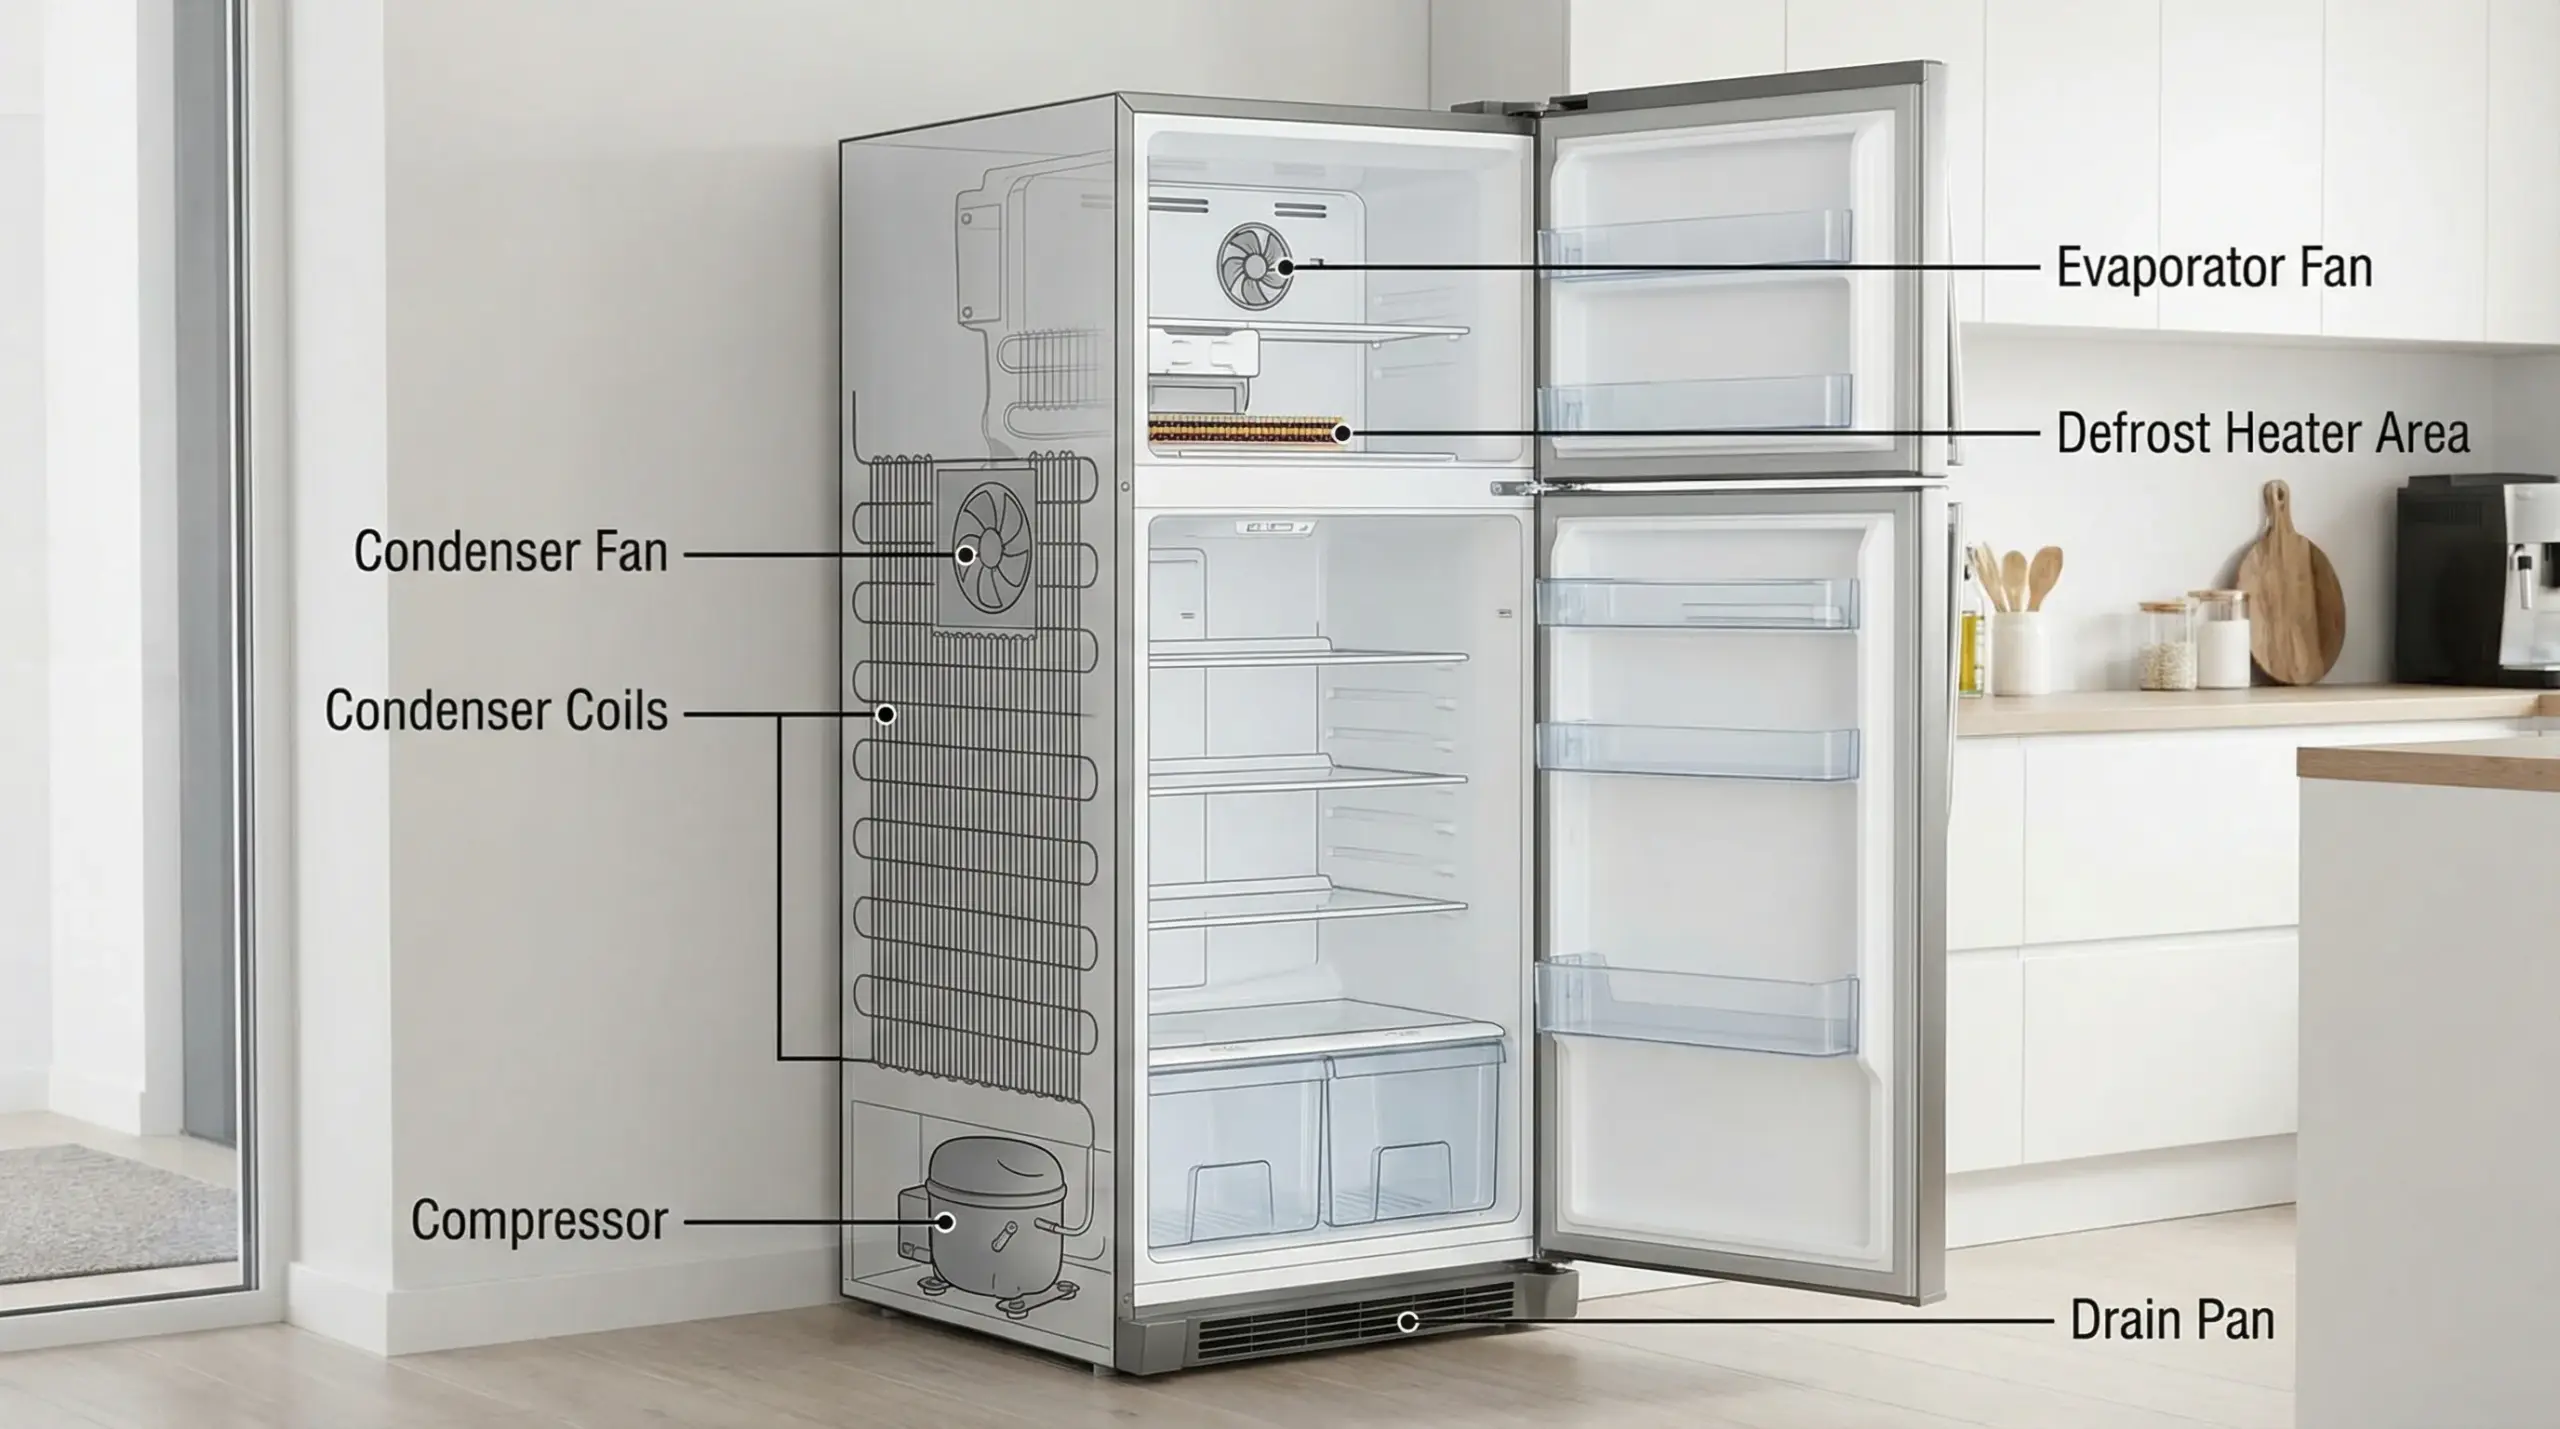
- Back/bottom: compressor, condenser fan, drain pan, vibration against wall
- Inside freezer: evaporator fan, ice maker, frost/ice contact
- Inside fresh food: damper/airflow components (model dependent), items vibrating on shelves
2) Confirm the “when”
Track whether it happens:
- Only when the compressor runs
- Only during ice maker activity
- Only after door openings
- In a repeating pattern (every few minutes)
3) Check temperature performance
Noise matters more when it comes with symptoms:
- Fridge above 40°F or freezer above 0°F (common food-safety targets referenced by the USDA)
- Frost buildup
- Excess condensation
- Unusual heat at the sides or back
If noise is new and temperatures are drifting, treat it as a repair priority.
Phoenix-specific note: heat changes what “normal” sounds like
In Phoenix, refrigerators often work harder for two reasons:
- Hot kitchens and garages increase run time.
- Dust and pet hair can accumulate quickly and reduce heat dissipation.
When a fridge cannot reject heat efficiently, you may hear longer humming, more fan operation, and sometimes more frequent cycling. If you live in an older home or keep the fridge in a warm garage, it’s especially important to maintain airflow and keep the condenser area clean.
When it’s time to call a technician (and what to document)
Call for service if you notice any of the following:
- Repeated rapid clicking with poor cooling
- Squealing or grinding that persists
- Buzzing paired with warming temperatures
- Heavy frost on the rear freezer panel
- Water leaks that keep returning
To speed up diagnosis (and avoid paying for guesswork), document:
- A 10 to 20 second audio clip of the sound
- Where it’s loudest (freezer, back-bottom, etc.)
- Temperature readings (even a simple fridge thermometer helps)
- Make/model and approximate age
If you’re weighing the economics of repair, you can compare common Phoenix pricing expectations in our guide to refrigerator repair cost in Phoenix and review decision factors in Is it worth repairing a refrigerator in Phoenix’s heat?.
Safety reminder before DIY checks
Basic checks like leveling, clearing airflow, and cleaning accessible condenser areas are usually safe if you unplug the unit first. Avoid cutting, piercing, or “topping off” anything related to refrigerant. Sealed-system work requires proper equipment and certification.
If you smell burning insulation, see smoke, or the unit trips the breaker repeatedly, unplug it and stop troubleshooting until it’s inspected.